
Slow Monster Pillow
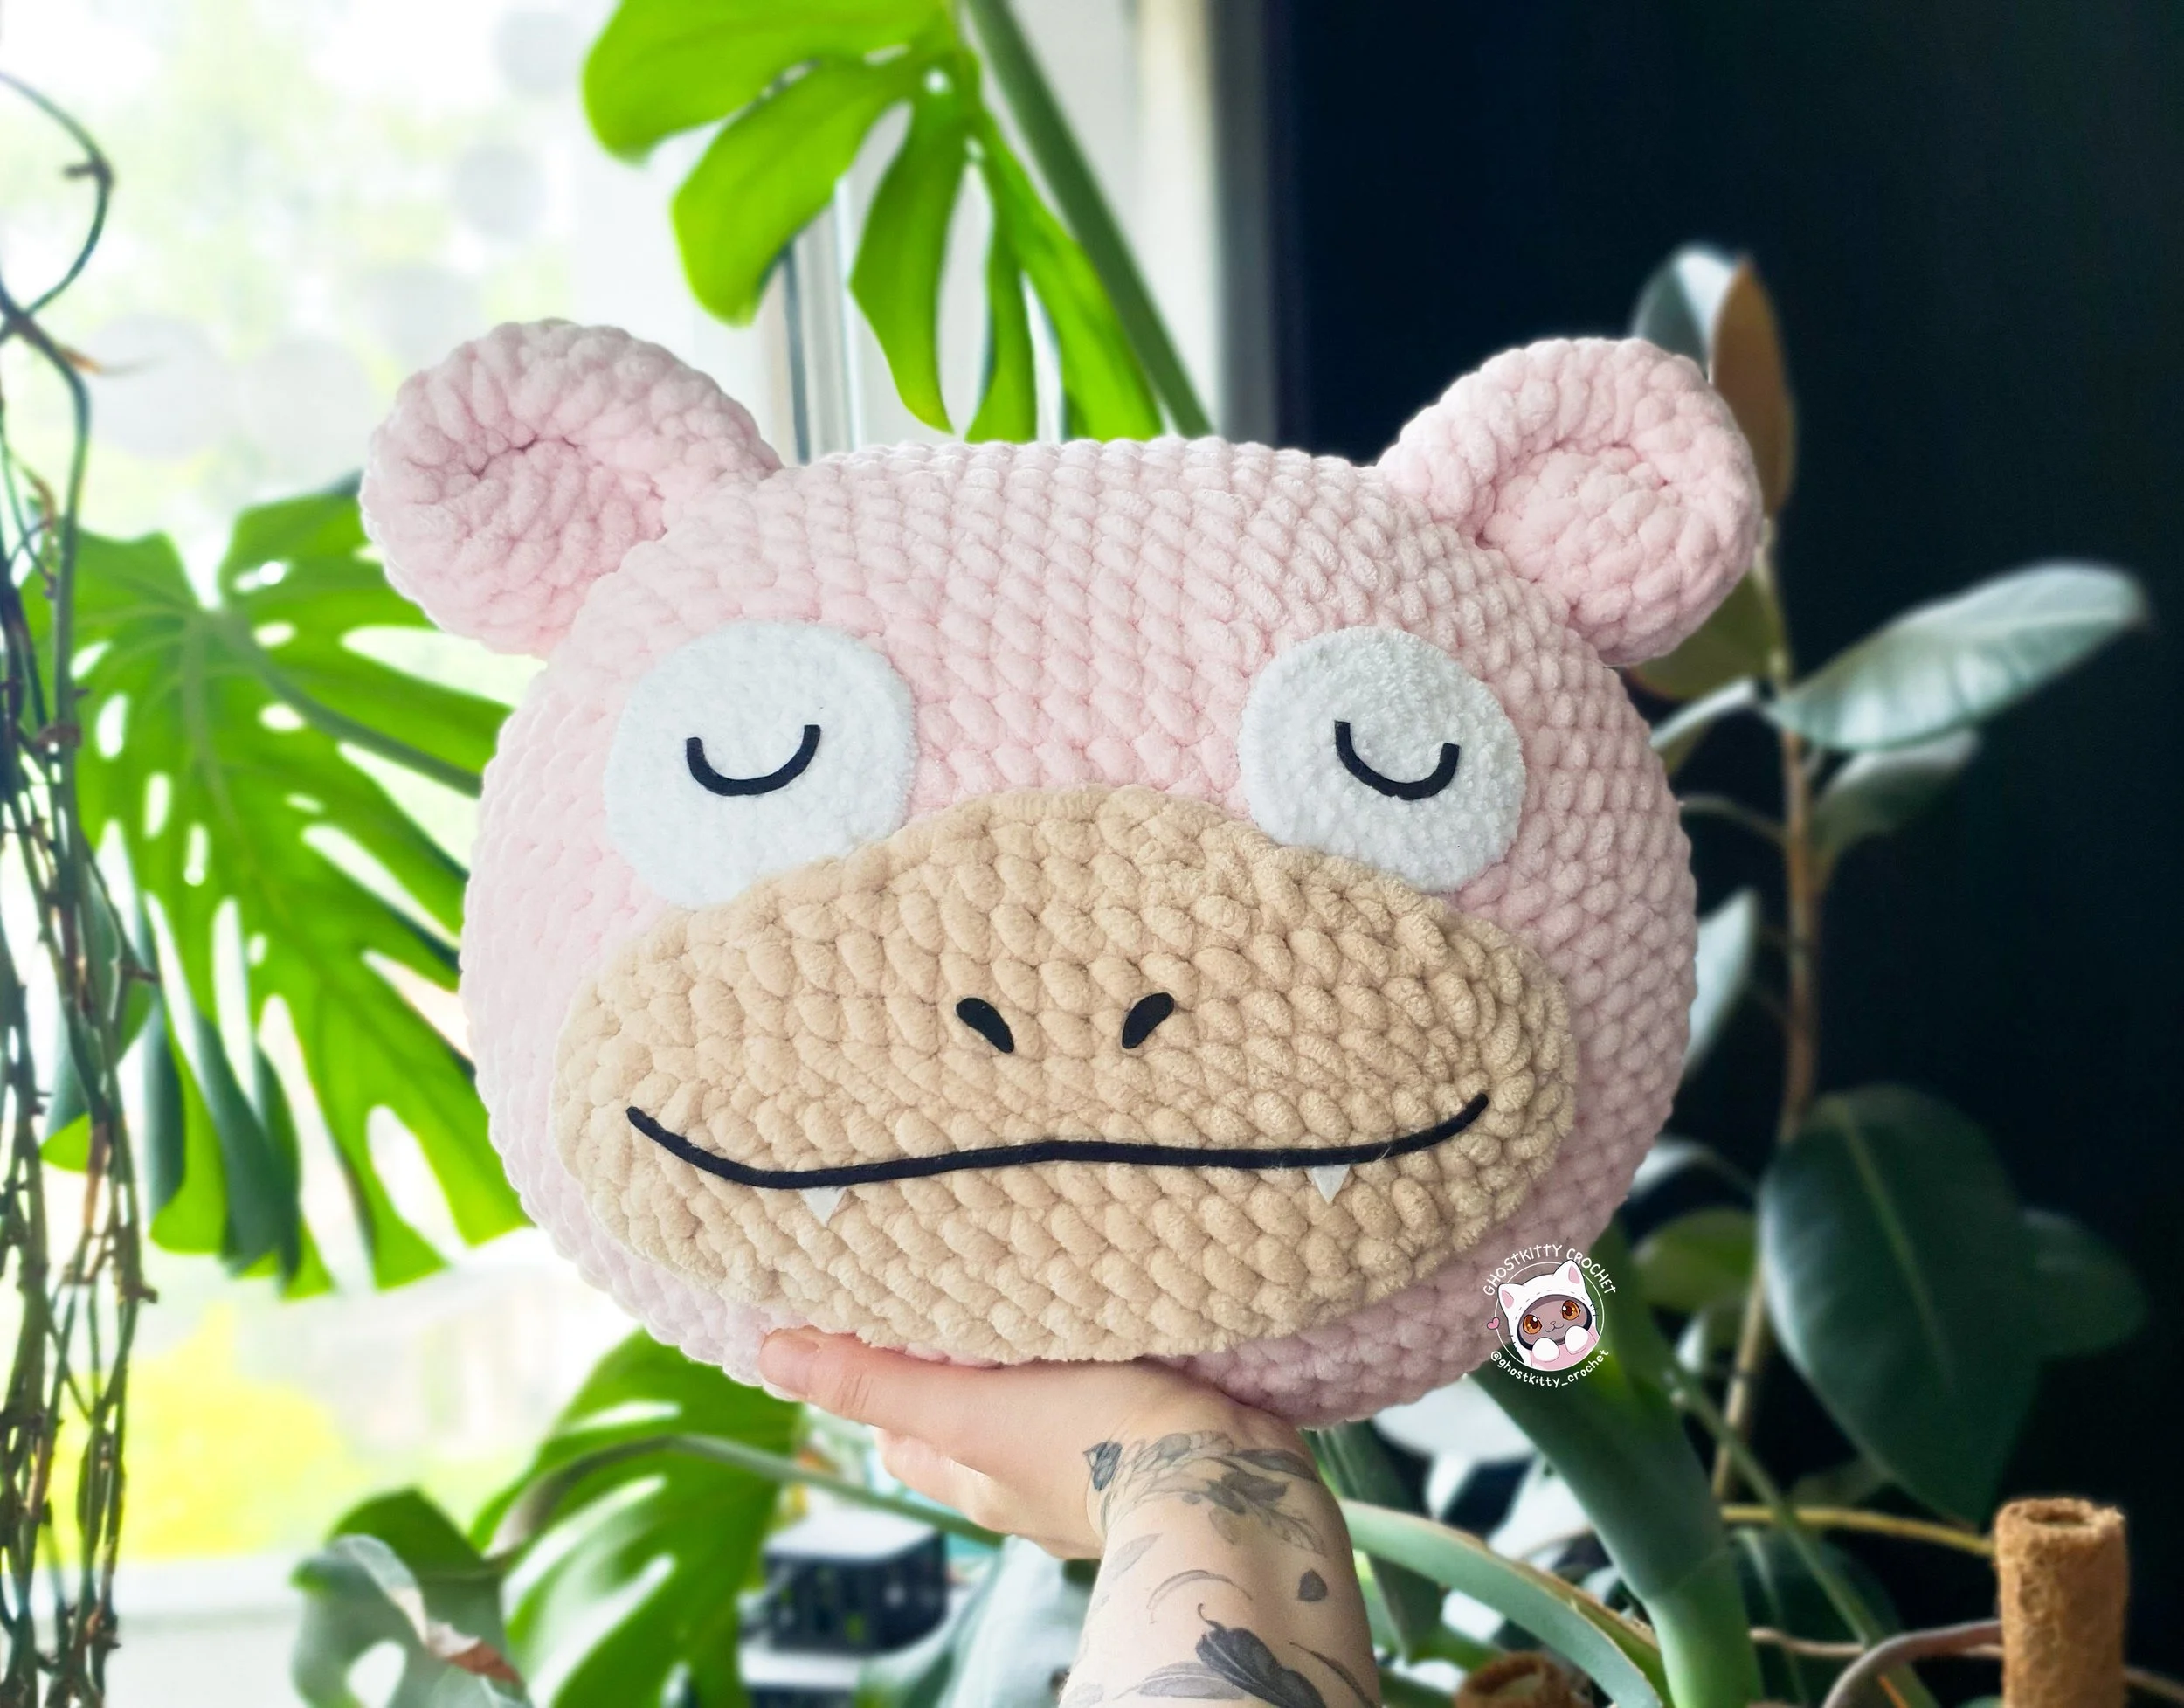
about the pattern:
This pattern is written in US terminology and worked in continuous rounds (unless otherwise specified). You can use any kind of yarn, but jumbo / super bulky yarn will make it the most pillow-sized. The size and proportions of the pillow will differ depending on your tension, yarn and hook size.
Size made with Hobbii Honey Bunny Big: 33 x 27 cm / 13 x 10.5 inches (without ears)
Size made with Alize Softy Mega: 25 x 22 cm / 10 x 8.5 inches (without ears)
hi, i’m sophia!
I hope you’ll have as much fun following this pattern as I’ve had writing it! If you ever need help, I’m happy to answer your questions! Just send me an e-mail or dm. :)
e-mail: ghostkitty.crochet@gmail.com
instagram: @ghostkitty_crochet
Materials
Yarn & Hooks:
Hobbii Honey Bunny Big with a 10.0 mm hook (pink: 320 g, beige: 60 g)
Hobbii Honey Bunny with a 5.0 mm hook (white: 10 g)
optional: Hobbii Friends Cotton 8/8 with a 4.0 mm hook (black: 5 g)
Other materials:
stitch markers (I like to use scrap yarn)
darning / tapestry needle
stuffing
sewing pins
sharp scissors
black cotton yarn and/or black felt
hot glue
paper and pencil for tracing or printing the face templates
Abbreviations
ch: chain
mr: magic ring
sc: single crochet
inc: increase
dec: invisible decrease
stsc: standing single crochet
*…*: work ... into the same stitch
(…) x2: repeat … the indicated number of times
Pillow
yarn: pink, hook: 10.00 mm
R1. ch8, starting in the 2nd ch from the hook: 6sc, inc, on the other side of the ch: inc, 5sc, [3sc] all in the last ch (18)
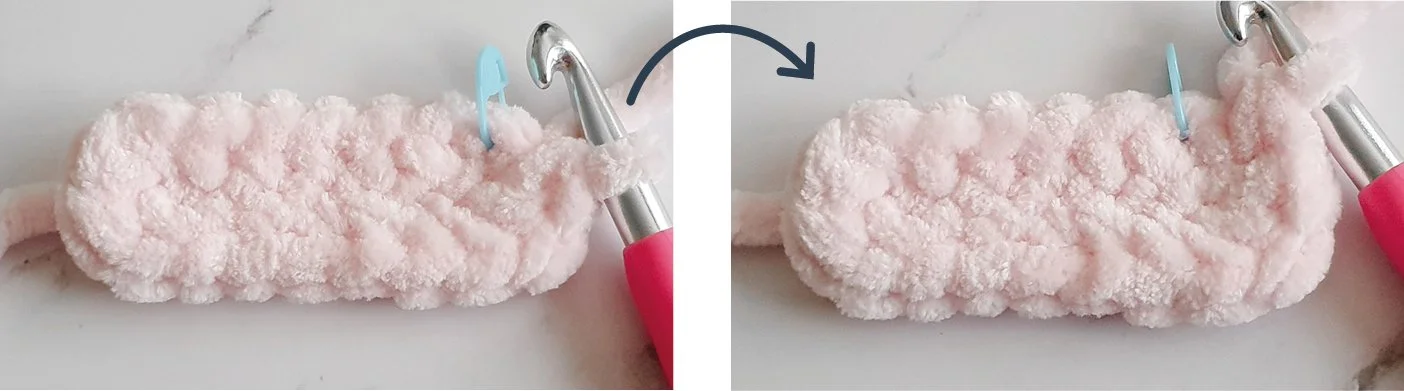
Make 1sc in the next stitch to offset the beginning of the round and move your stitch marker. This counts as the last sc of round 1.
From here on, we're going to treat the far ends as two halves of a magic ring with 8sc, separated by 5 stitches in between them.
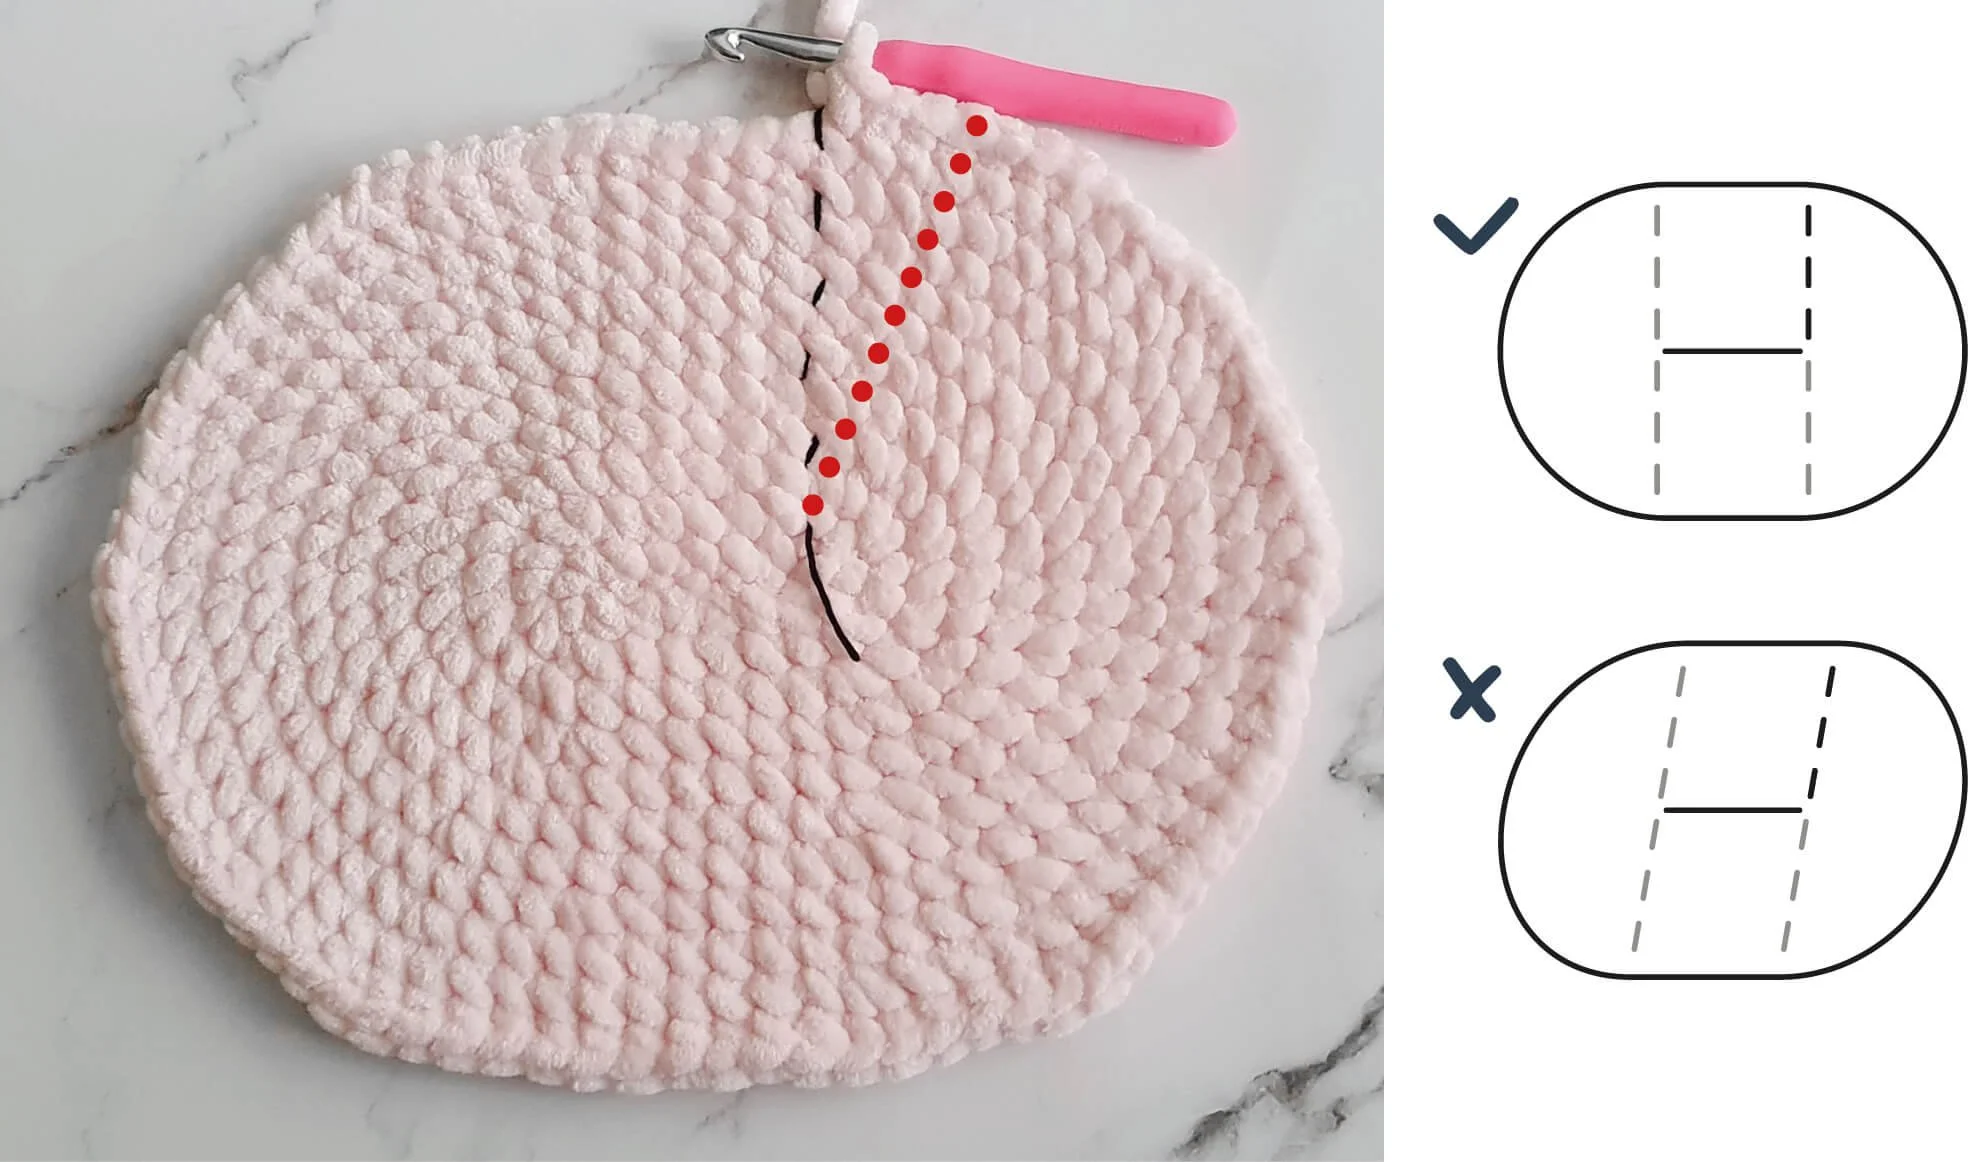
slanting & how to offset it
The five center stitches should always stay right in the middle of the pillow. But as you crochet, your rounds may be slanting to the side (like the red dotted line). How much they slant depends on your yarn, tension and whether you yarn under or yarn over.
To offset this, you can add an extra sc at the end of a round to change where your round begins, whenever you notice that your rounds have slanted a bit.
I highly recommend using scrap yarn as a stitch marker to keep track of where all of the rounds begin and end.
R2. (5sc, 4inc) x2 (26)
R3. 5sc, (inc, sc) x4, 5sc, (inc, sc) x4 (34)
R4. 5sc, (3sc, inc) x3, 5sc, (3sc, inc) x3 (40)
R5. 5sc, (2sc, inc, 2sc) x3, 5sc, (2sc, inc, 2sc) x3 (46)
R6. 5sc, (inc, 5sc) x3, 5sc, (inc, 5sc) x3 (52)
R7. 5sc, (3sc, inc, 3sc) x3, 5sc, (3sc, inc, 3sc) x3 (58)
R8. 5sc, (7sc, inc) x3, 5sc, (7sc, inc) x3 (64)
R9. 5sc, (4sc, inc, 4sc) x3, 5sc, (4sc, inc, 4sc) x3 (70)
R10. 5sc, (inc, 9sc) x3, 5sc, (inc, 9sc) x3 (76)
R11. 5sc, (5sc, inc, 5sc) x3, 5sc, (5sc, inc, 5sc) x3 (82)
This flat oval piece is the pillow's front side.
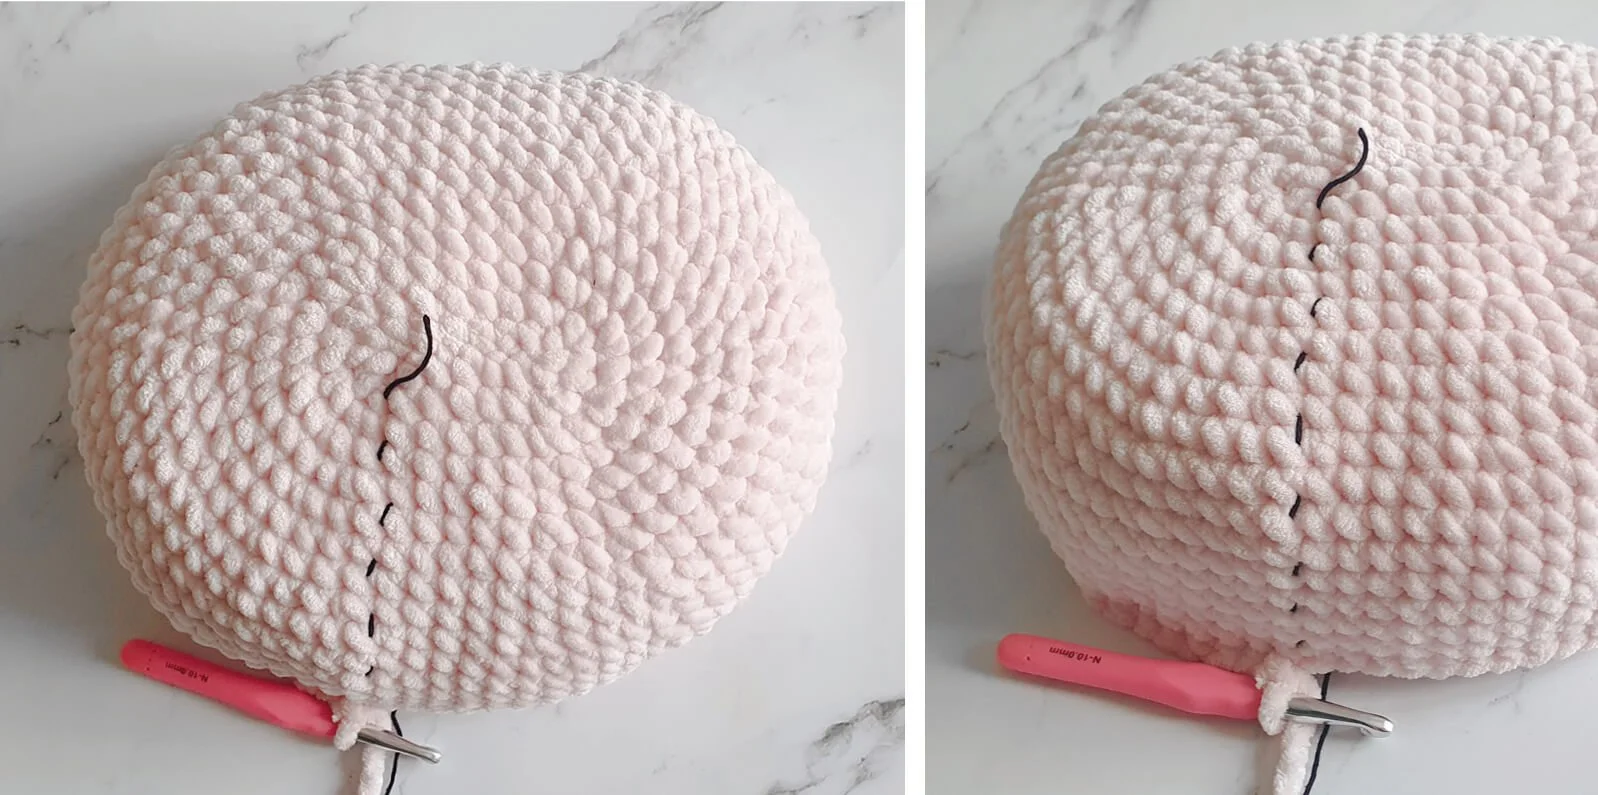
R12-18. sc around - 7 rounds (82)
If you want your pillow thinner or thicker, simply decrease or increase the number of rounds.
Check if your rounds have slanted and offset this by adding extra sc.
R19. 5sc, (5sc, dec, 5sc) x3, 5sc, (5sc, dec, 5sc) x3 (76)
R20. 5sc, (dec, 9sc) x3, 5sc, (dec, 9sc) x3 (70)
R21. 5sc, (4sc, dec, 4sc) x3, 5sc, (4sc, dec, 4sc) x3 (64)
R22. 5sc, (7sc, dec) x3, 5sc, (7sc, dec) x3 (58)
R23. 5sc, (3sc, dec, 3sc) x3, 5sc, (3sc, dec, 3sc) x3 (52)
R24. 5sc, (dec, 5sc) x3, 5sc, (dec, 5sc) x3 (46)
R25. 5sc, (2sc, dec, 2sc) x3, 5sc, (2sc, dec, 2sc) x3 (40)
R26. 5sc, (3sc, dec) x3, 5sc, (3sc, dec) x3 (34)
Stuff your pillow. I recommend not stuffing it too firmly.
R27. 5sc, (dec, sc) x4, 5sc, (dec, sc) x4 (26)
R28. (5sc, 4dec) x2 (18)
Fasten off and leave a long tail for sewing.
To sew the hole closed, we're going to treat the far ends like two halves of a circle, and join the flat sides in between with a mattress stitch.
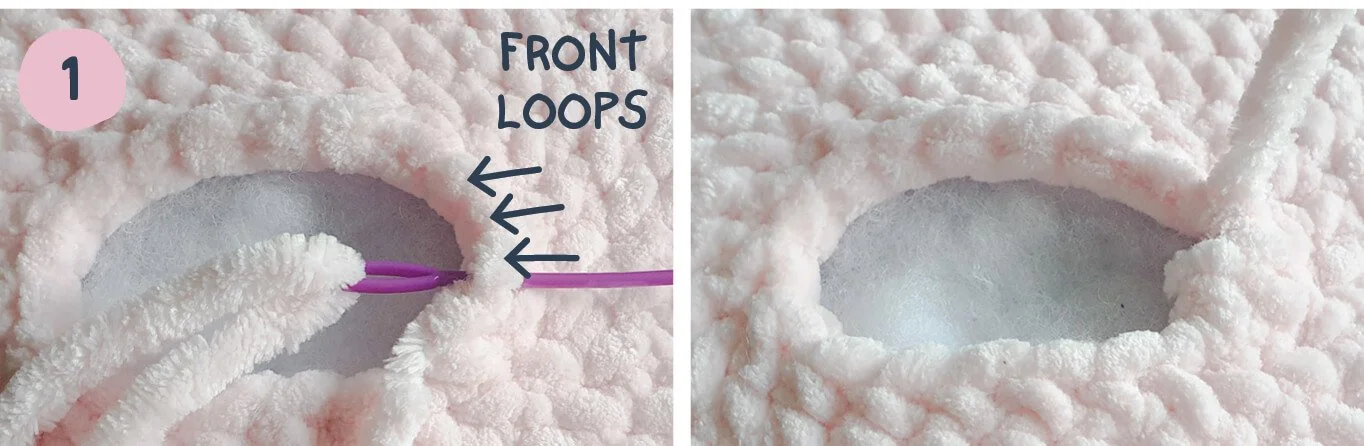
First, close the first half-circle:
Skip the last stitch and weave the tail through the front loops of the other three stitches. Pull after every stitch instead of just at the end, and be careful not to snap the yarn.
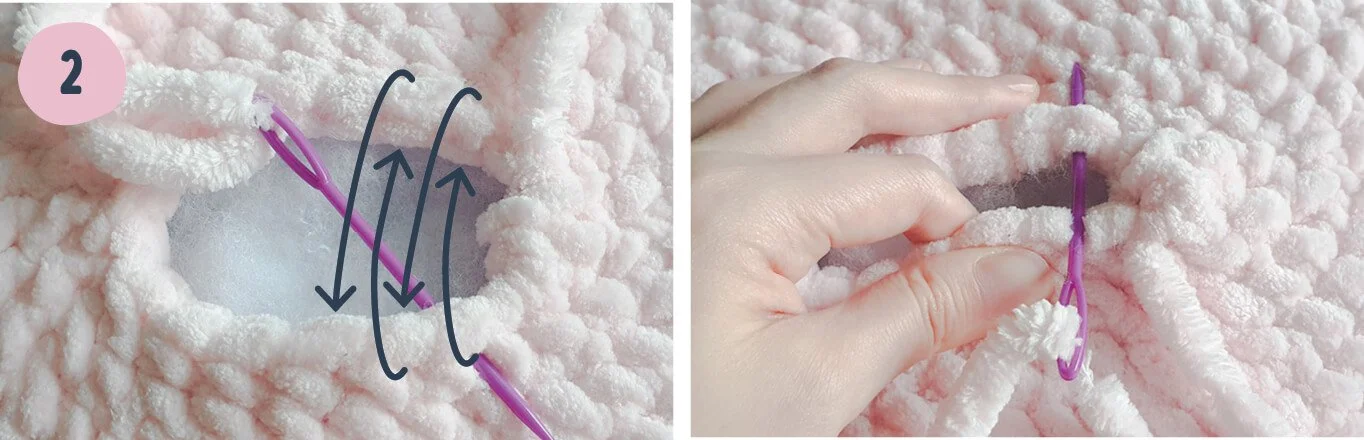
Now connect the two sides with a mattress stitch:
Weave the tail through the first stitch on the bottom side from the inside to the outside and pull.
Then weave it through the first stitch on the top side from the inside to the outside and pull. Pinch the hole together with your hands so there isn't so much tension on the yarn.
Keep going back and forth through the remaining 8 stitches of the flat sides, always going from the inside to the outside.
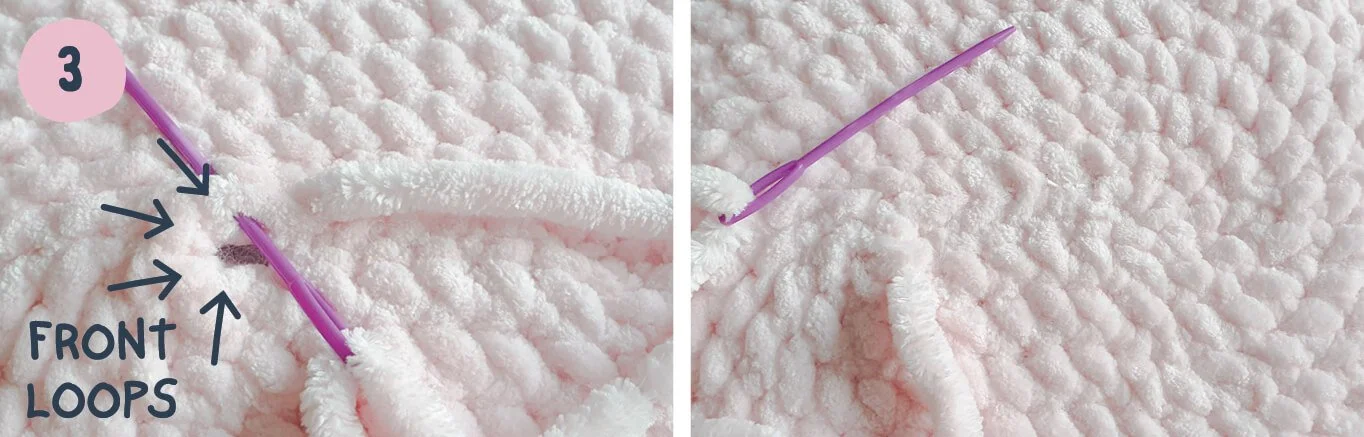
Last, close the second half-circle:
Weave your tail through the front loops of the remaining 4 stitches and pull to close the hole.
Weave in the tail. Done! :)
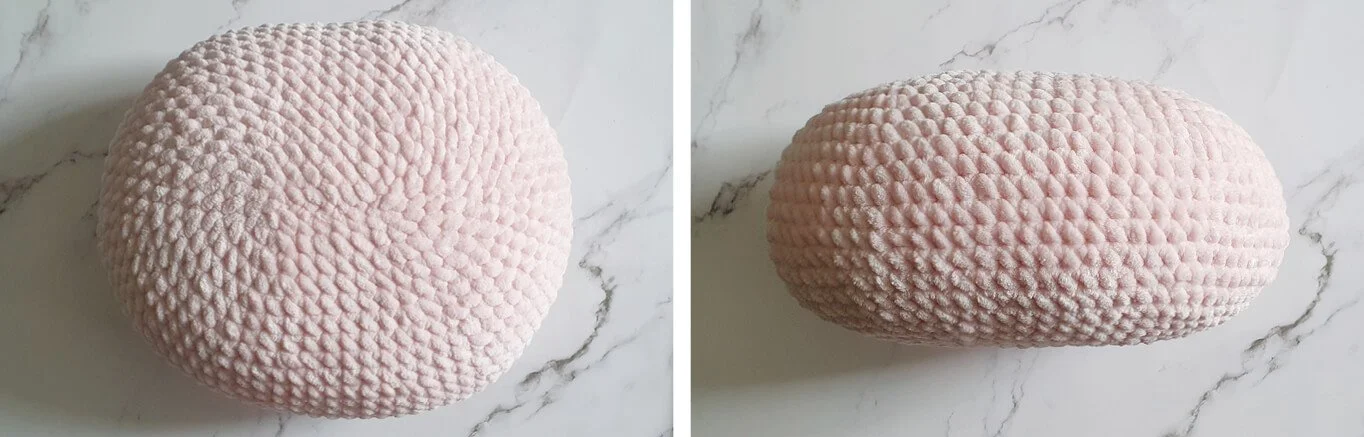
Congrats, the biggest part is done! Now let‘s make the details!
Ears
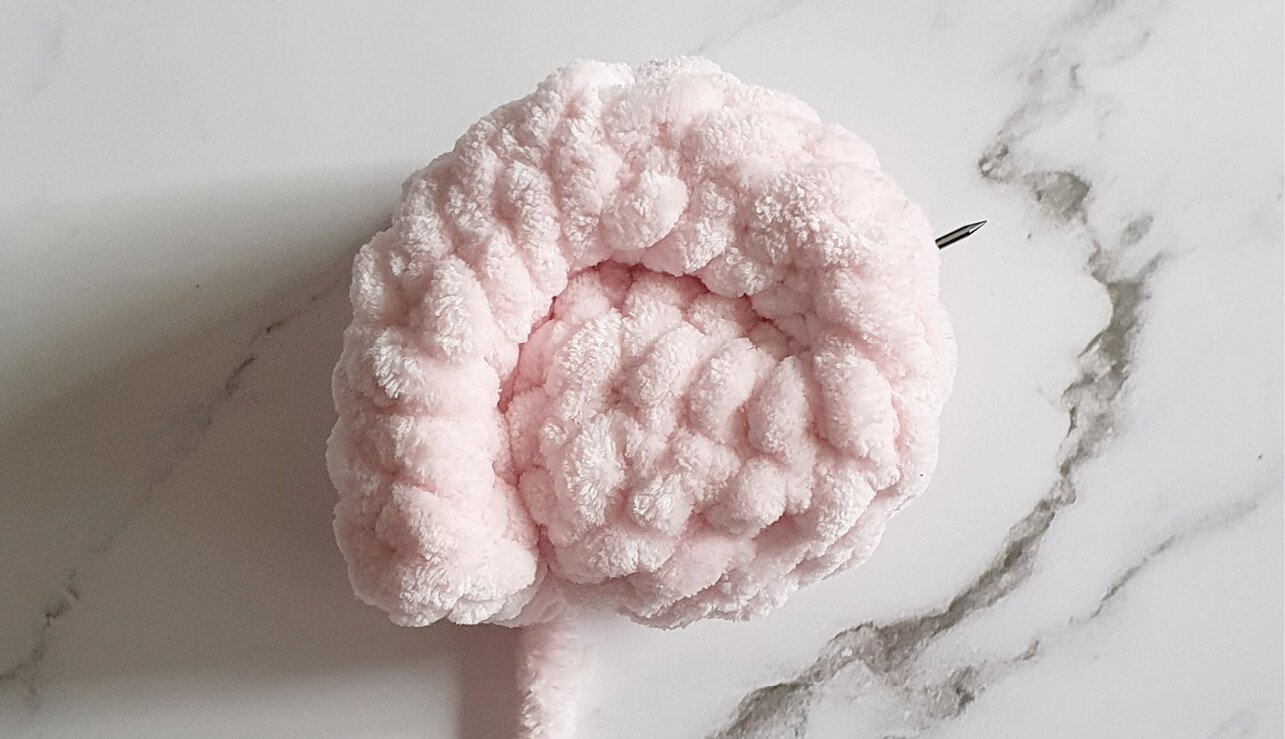
yarn: pink, hook: 10.00 mm, make two ears
R1. 6sc in mr (6)
R2. 6inc (12)
R3-11. sc around - 9 rounds (12)
Stuff only the tip of the ear so when you roll it up it folds after round 5 or 6.
R12. 6sc, skip the remaining stitches (6)
Fasten off. No need to leave a long tail.
before we continue: learn how to do a standing sc (stsc)
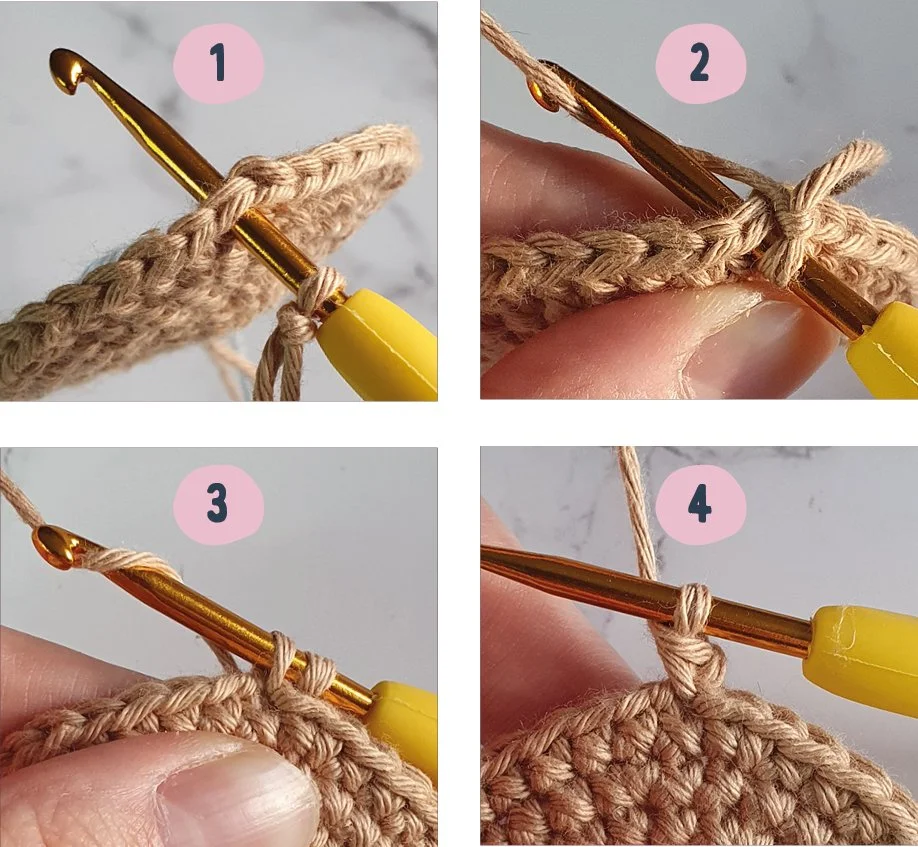
This is an easy way to start a new row on top of any stitch of a row / round. This is how you do it:
Make a slip knot and put it on your hook, then insert the hook into a stitch.
Yarn under and pull through the stitch.
Yarn over and pull through both loops.
Done! You've made a standing sc and can continue crocheting as usual. :)
Now let’s continue making the ears using this technique!
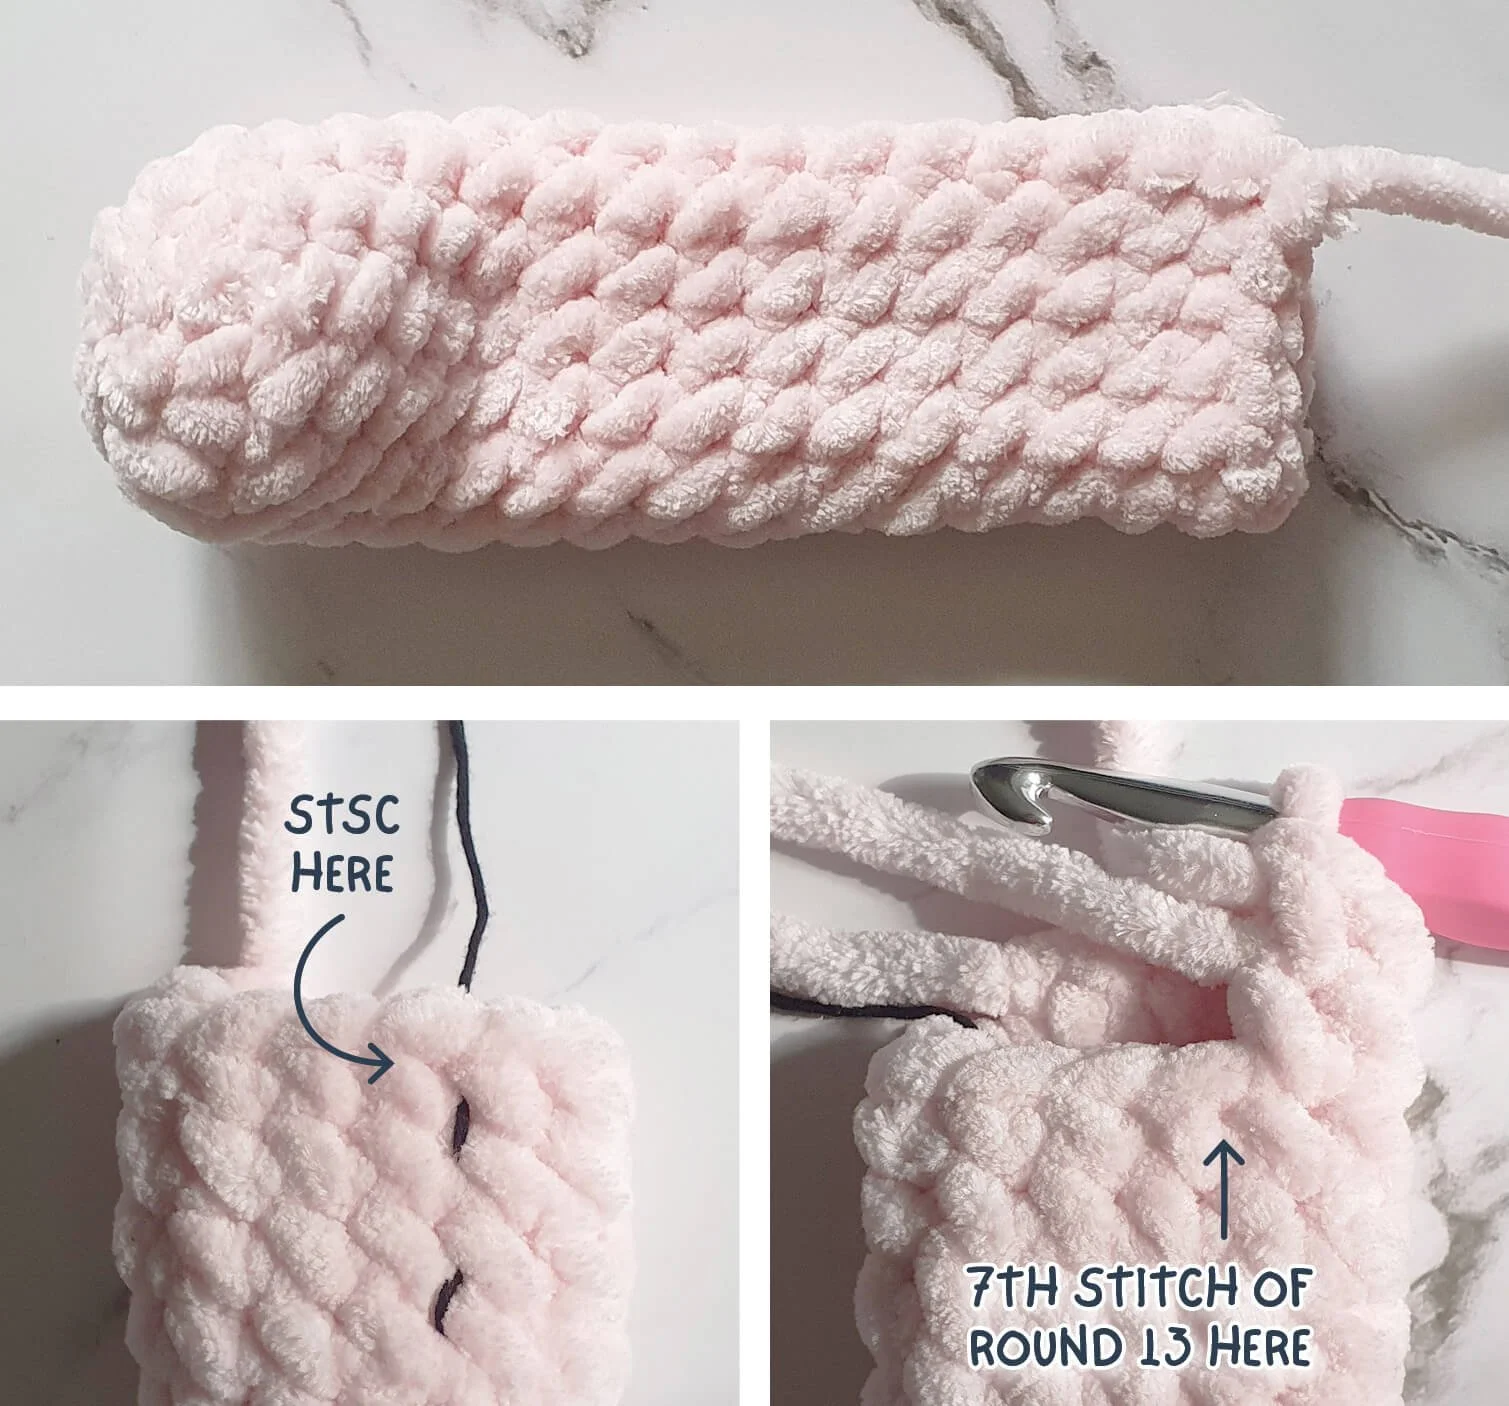
R13. stsc in the first stitch of round 12 and sc around (12)
R14-15. sc around - 2 rounds (12)
R16. 6sc, skip the remaining stitches (6)
Fasten off. No need to leave a long tail.
R17. stsc in the first stitch of round 16 and sc around (12)
R18-19. sc around - 2 rounds (12)
Fasten off and leave a long tail for sewing.
Roll the ear up. The two extra half-rows should be on the outer side. Make some sewing stitches so the ear stays rolled up.
Muzzle
yarn: beige, hook: 10.00 mm
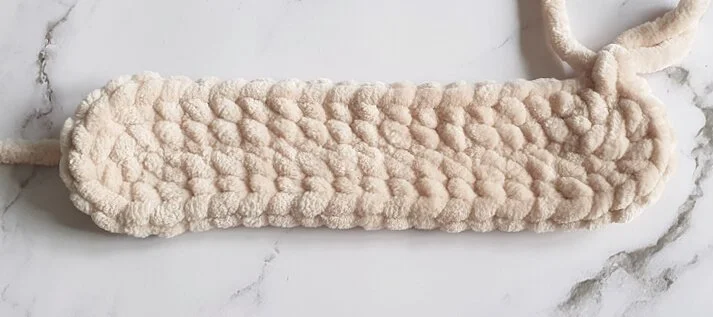
R1. ch18, starting in the 2nd ch from the hook: 16sc, inc, on the other side of the ch: inc, 15sc, [3sc] all in the last ch (38)
Make 1sc in the next stitch to offset the beginning of the round. This counts as the last sc of round 1.
R2. (15sc, 4inc) x2 (46)
DO NOT fasten off, but cut the yarn, leaving a long tail. We'll continue crocheting with this tail after round 2-E. But first we're going to create the muzzle's shape by attaching new pieces of yarn to add some extra partial rows.
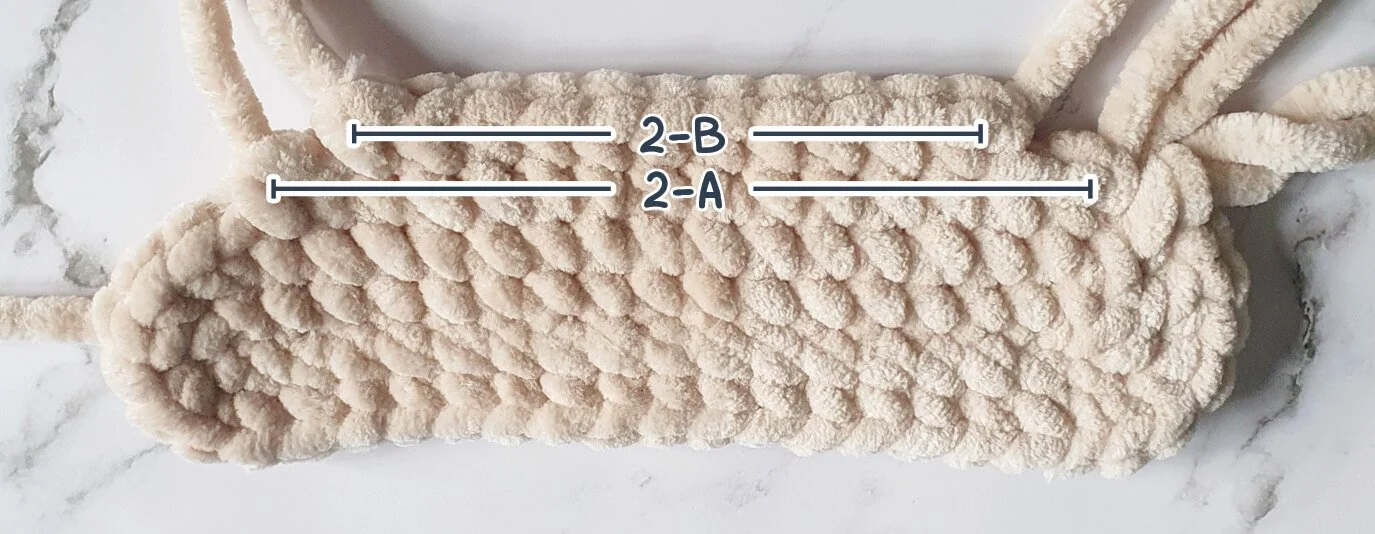
The bottom of the muzzle
R2-A. stsc in the next stitch, 14sc, fasten off (15)
R2-B. stsc in the third stitch of row 2-A, 10sc, fasten off (11)
These two rows create the bottom of the muzzle. Rotate the piece, so we can work into the other side next to create the top of the muzzle.
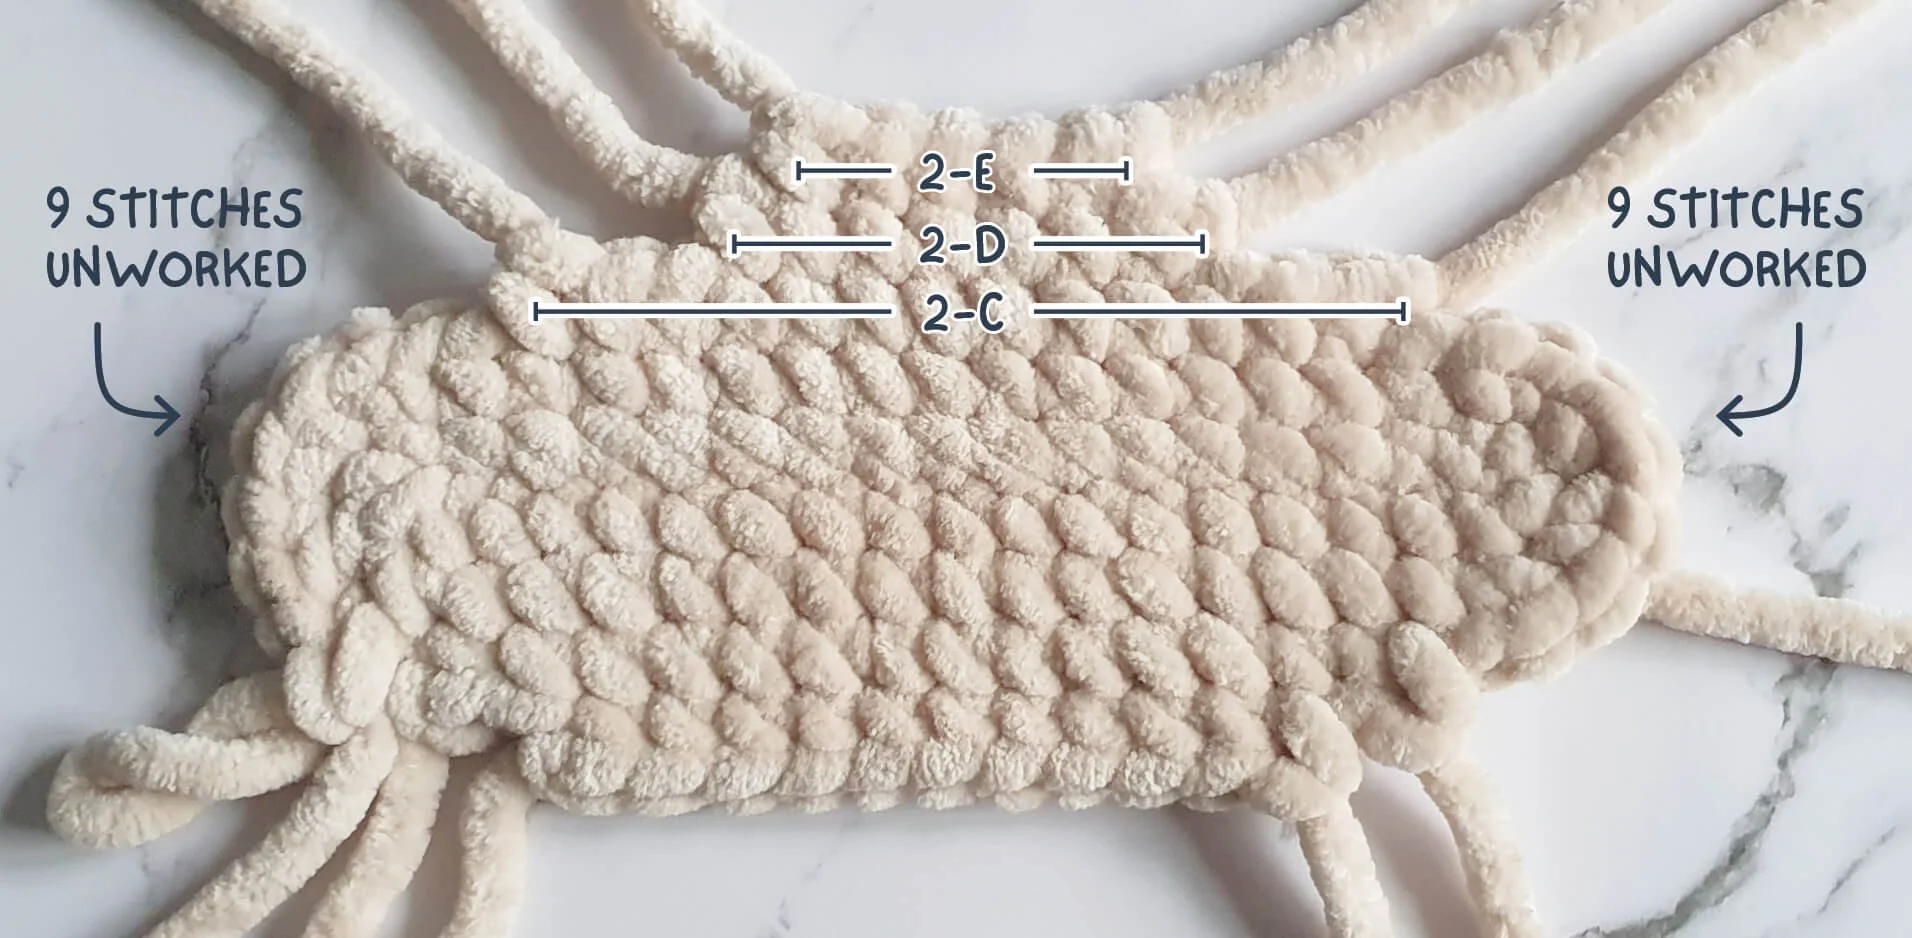
The top of the muzzle
R2-C. skip 9 stitches after row 2-A, stsc in the 10th stitch, 12sc, fasten off (13)
There should be 9 stitches left unworked on the left side and right side.
R2-D. stsc in the 4th stitch of row 2-C, 6sc, fasten off (7)
R2-E. stsc in the 2nd stitch of row 2-D, 4sc, fasten off (5)
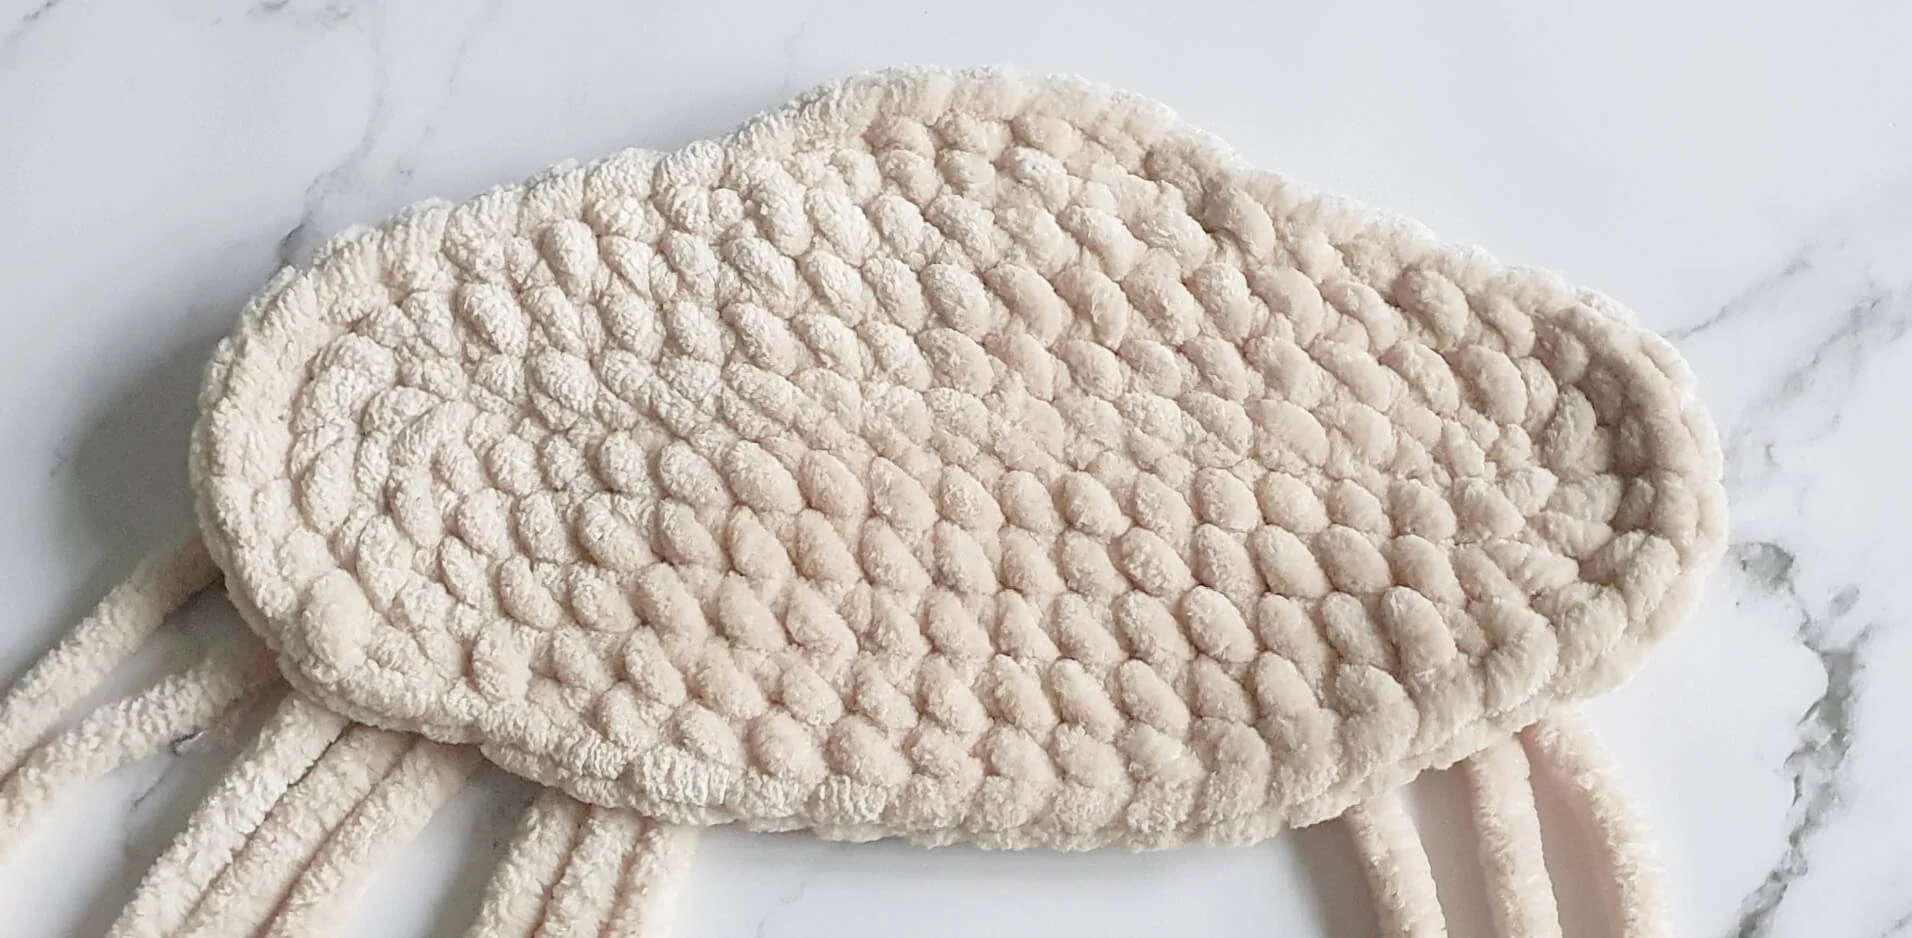
Border around the muzzle
Now we're going to continue where we left off after round 2 and crochet all around the piece to create a smooth border.
R3. sc around (46)
Invisibly fasten off and leave a long tail for sewing. No need to weave in the ends. We're going to hide them inside the pillow later.
Eyes
Yarn: white, hook: 5.0 mm, make two eyes
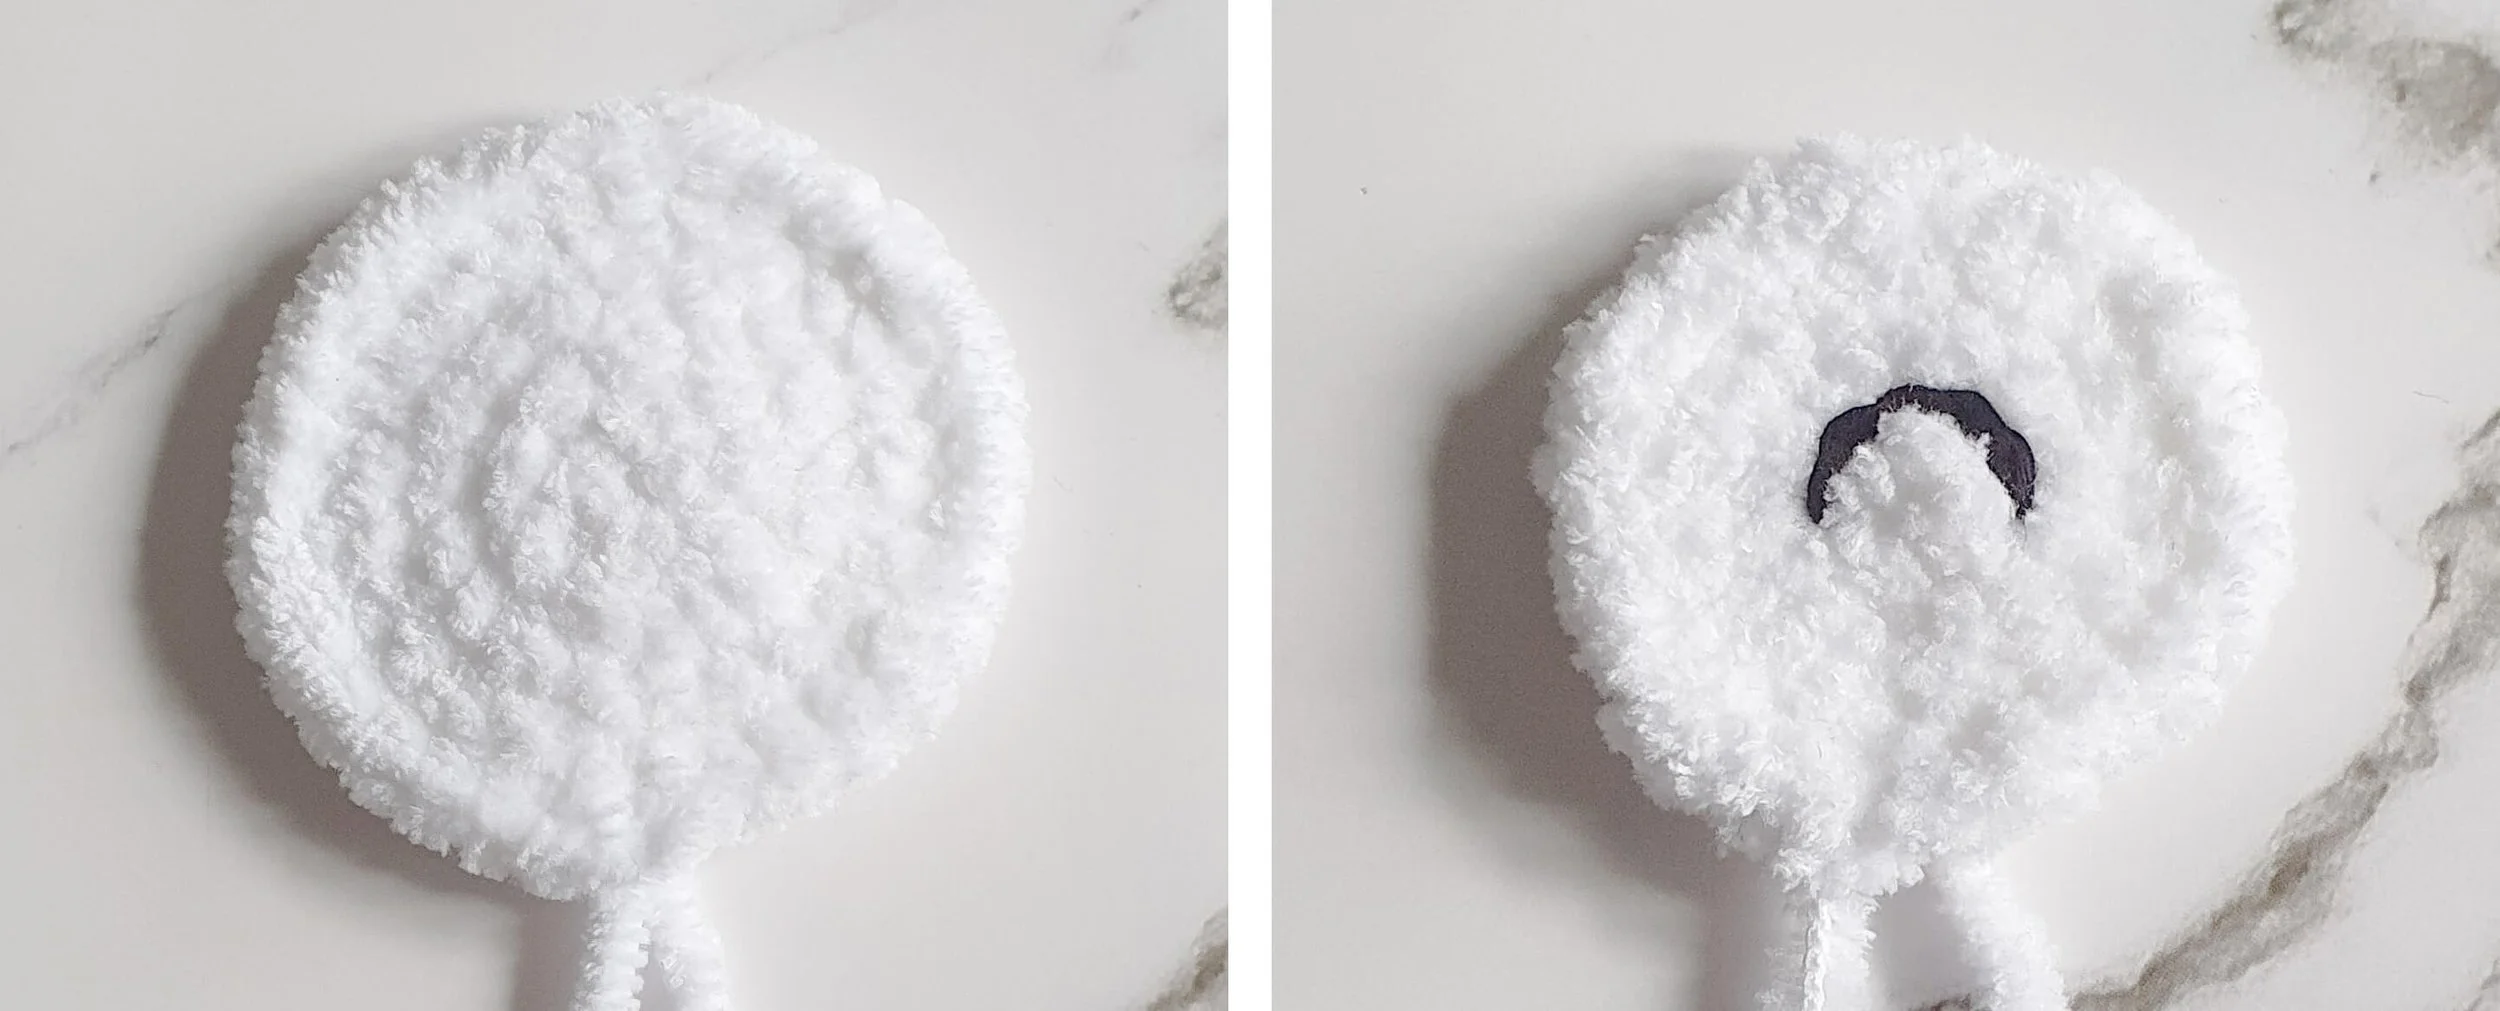
I recommend making the eyes with smaller yarn than the other parts. If you prefer, you can use white felt instead.
R1. 8sc in mr (8)
R2. 8inc (16)
R3. (inc, sc) x8 (24)
R4. (sc, inc, 2sc) x6 (30)
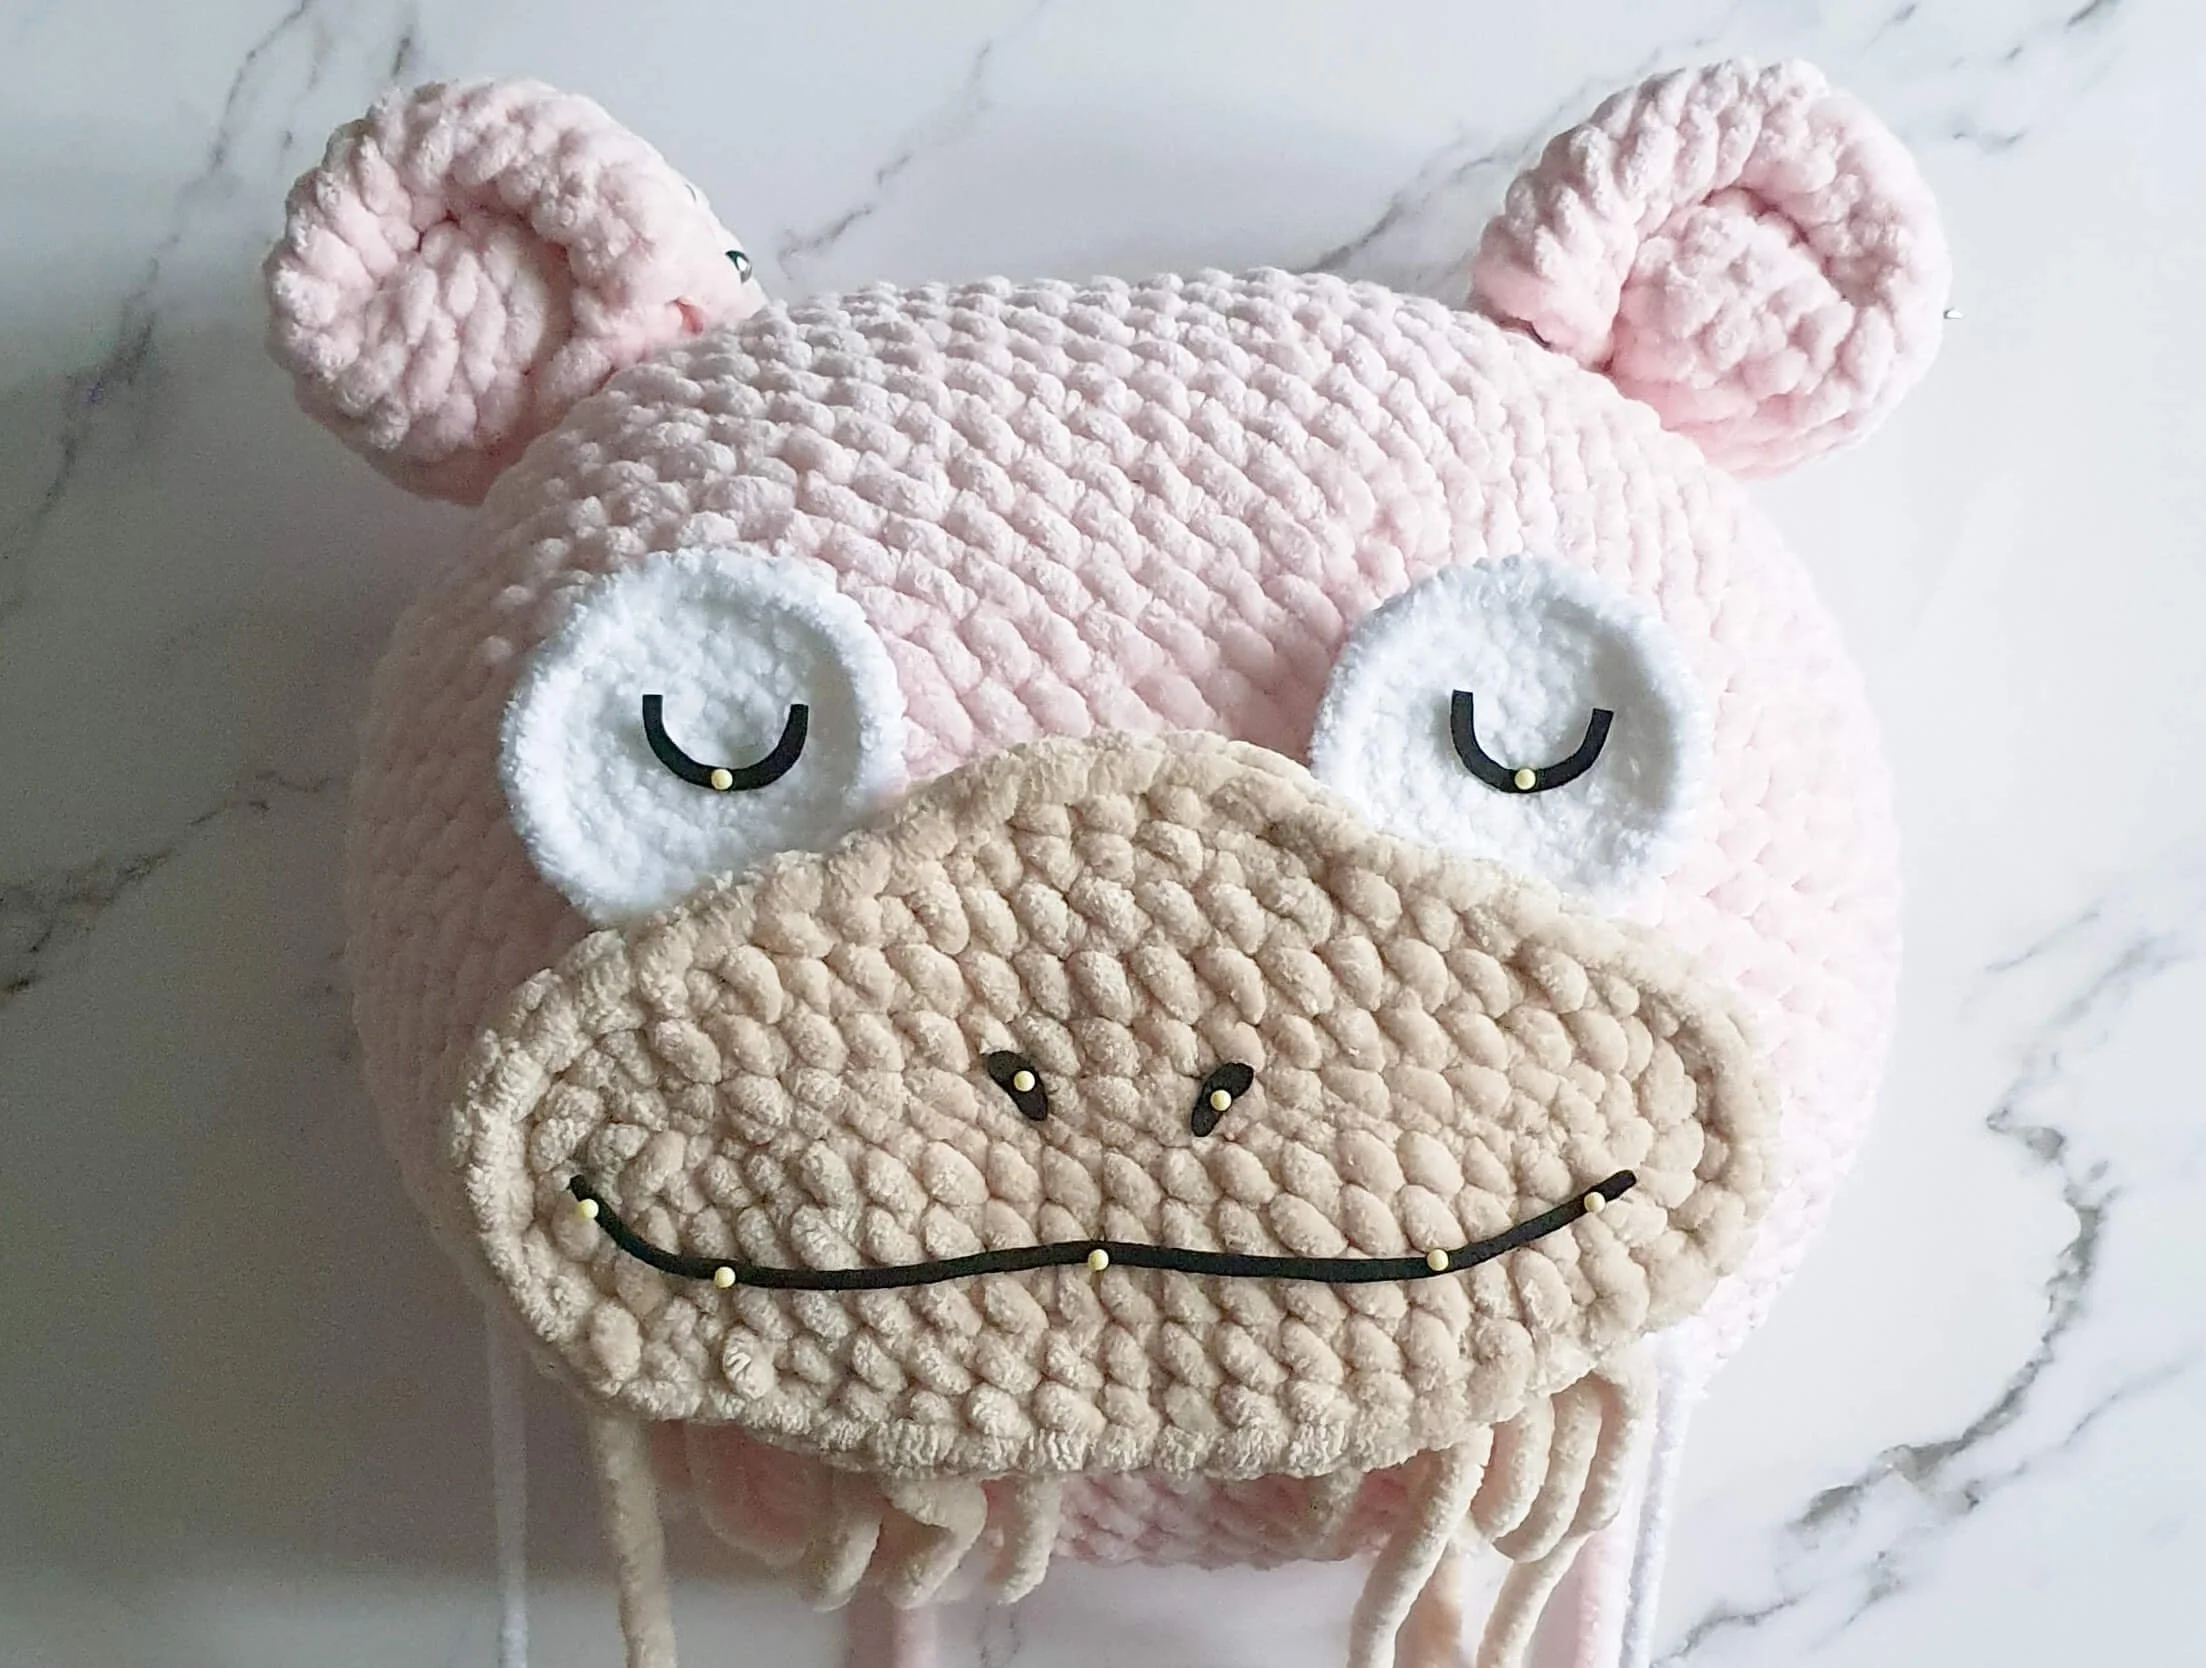
Pin the muzzle and eye onto your pillow and see if the size looks alright. If it's still too small, add more rounds and check the size after every round.
Optional additional rounds:
R5. (4sc, inc) x6 (36)
R6. (2sc, inc, 3sc) x6 (42)
R7. (6sc, inc) x6 (48)
Once you're happy with the size, invisibly fasten off and leave a long tail for sewing.
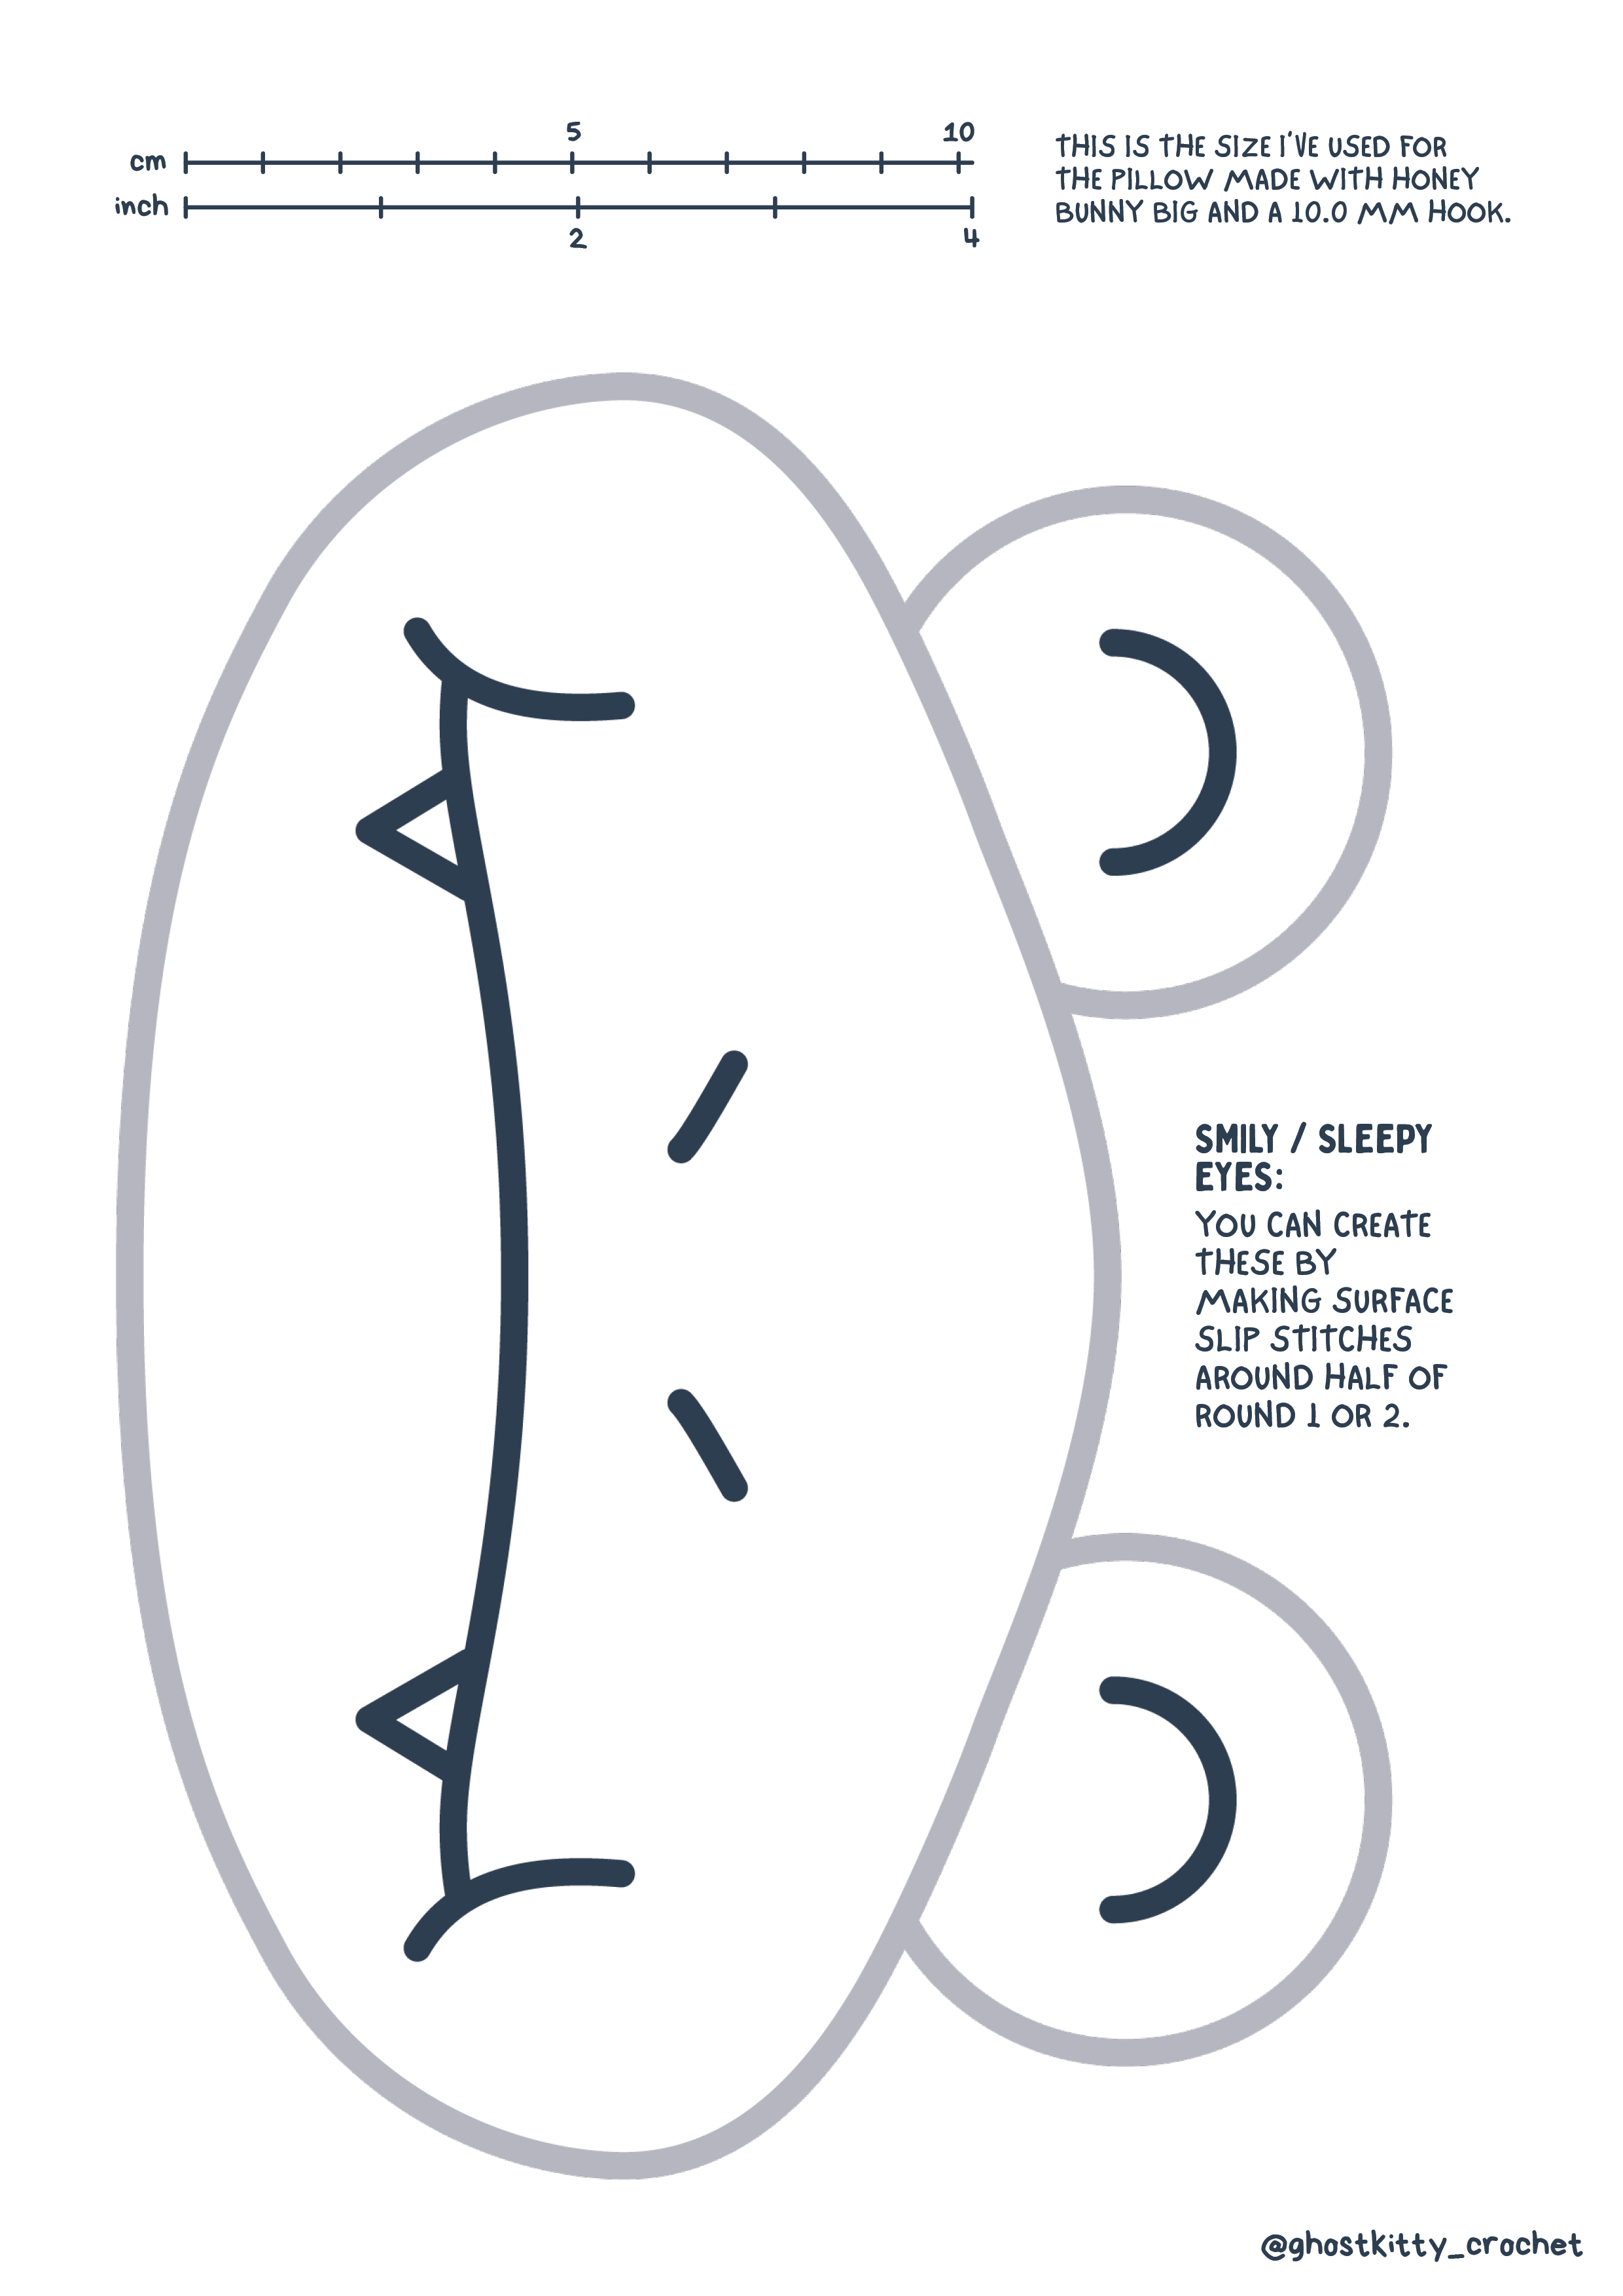
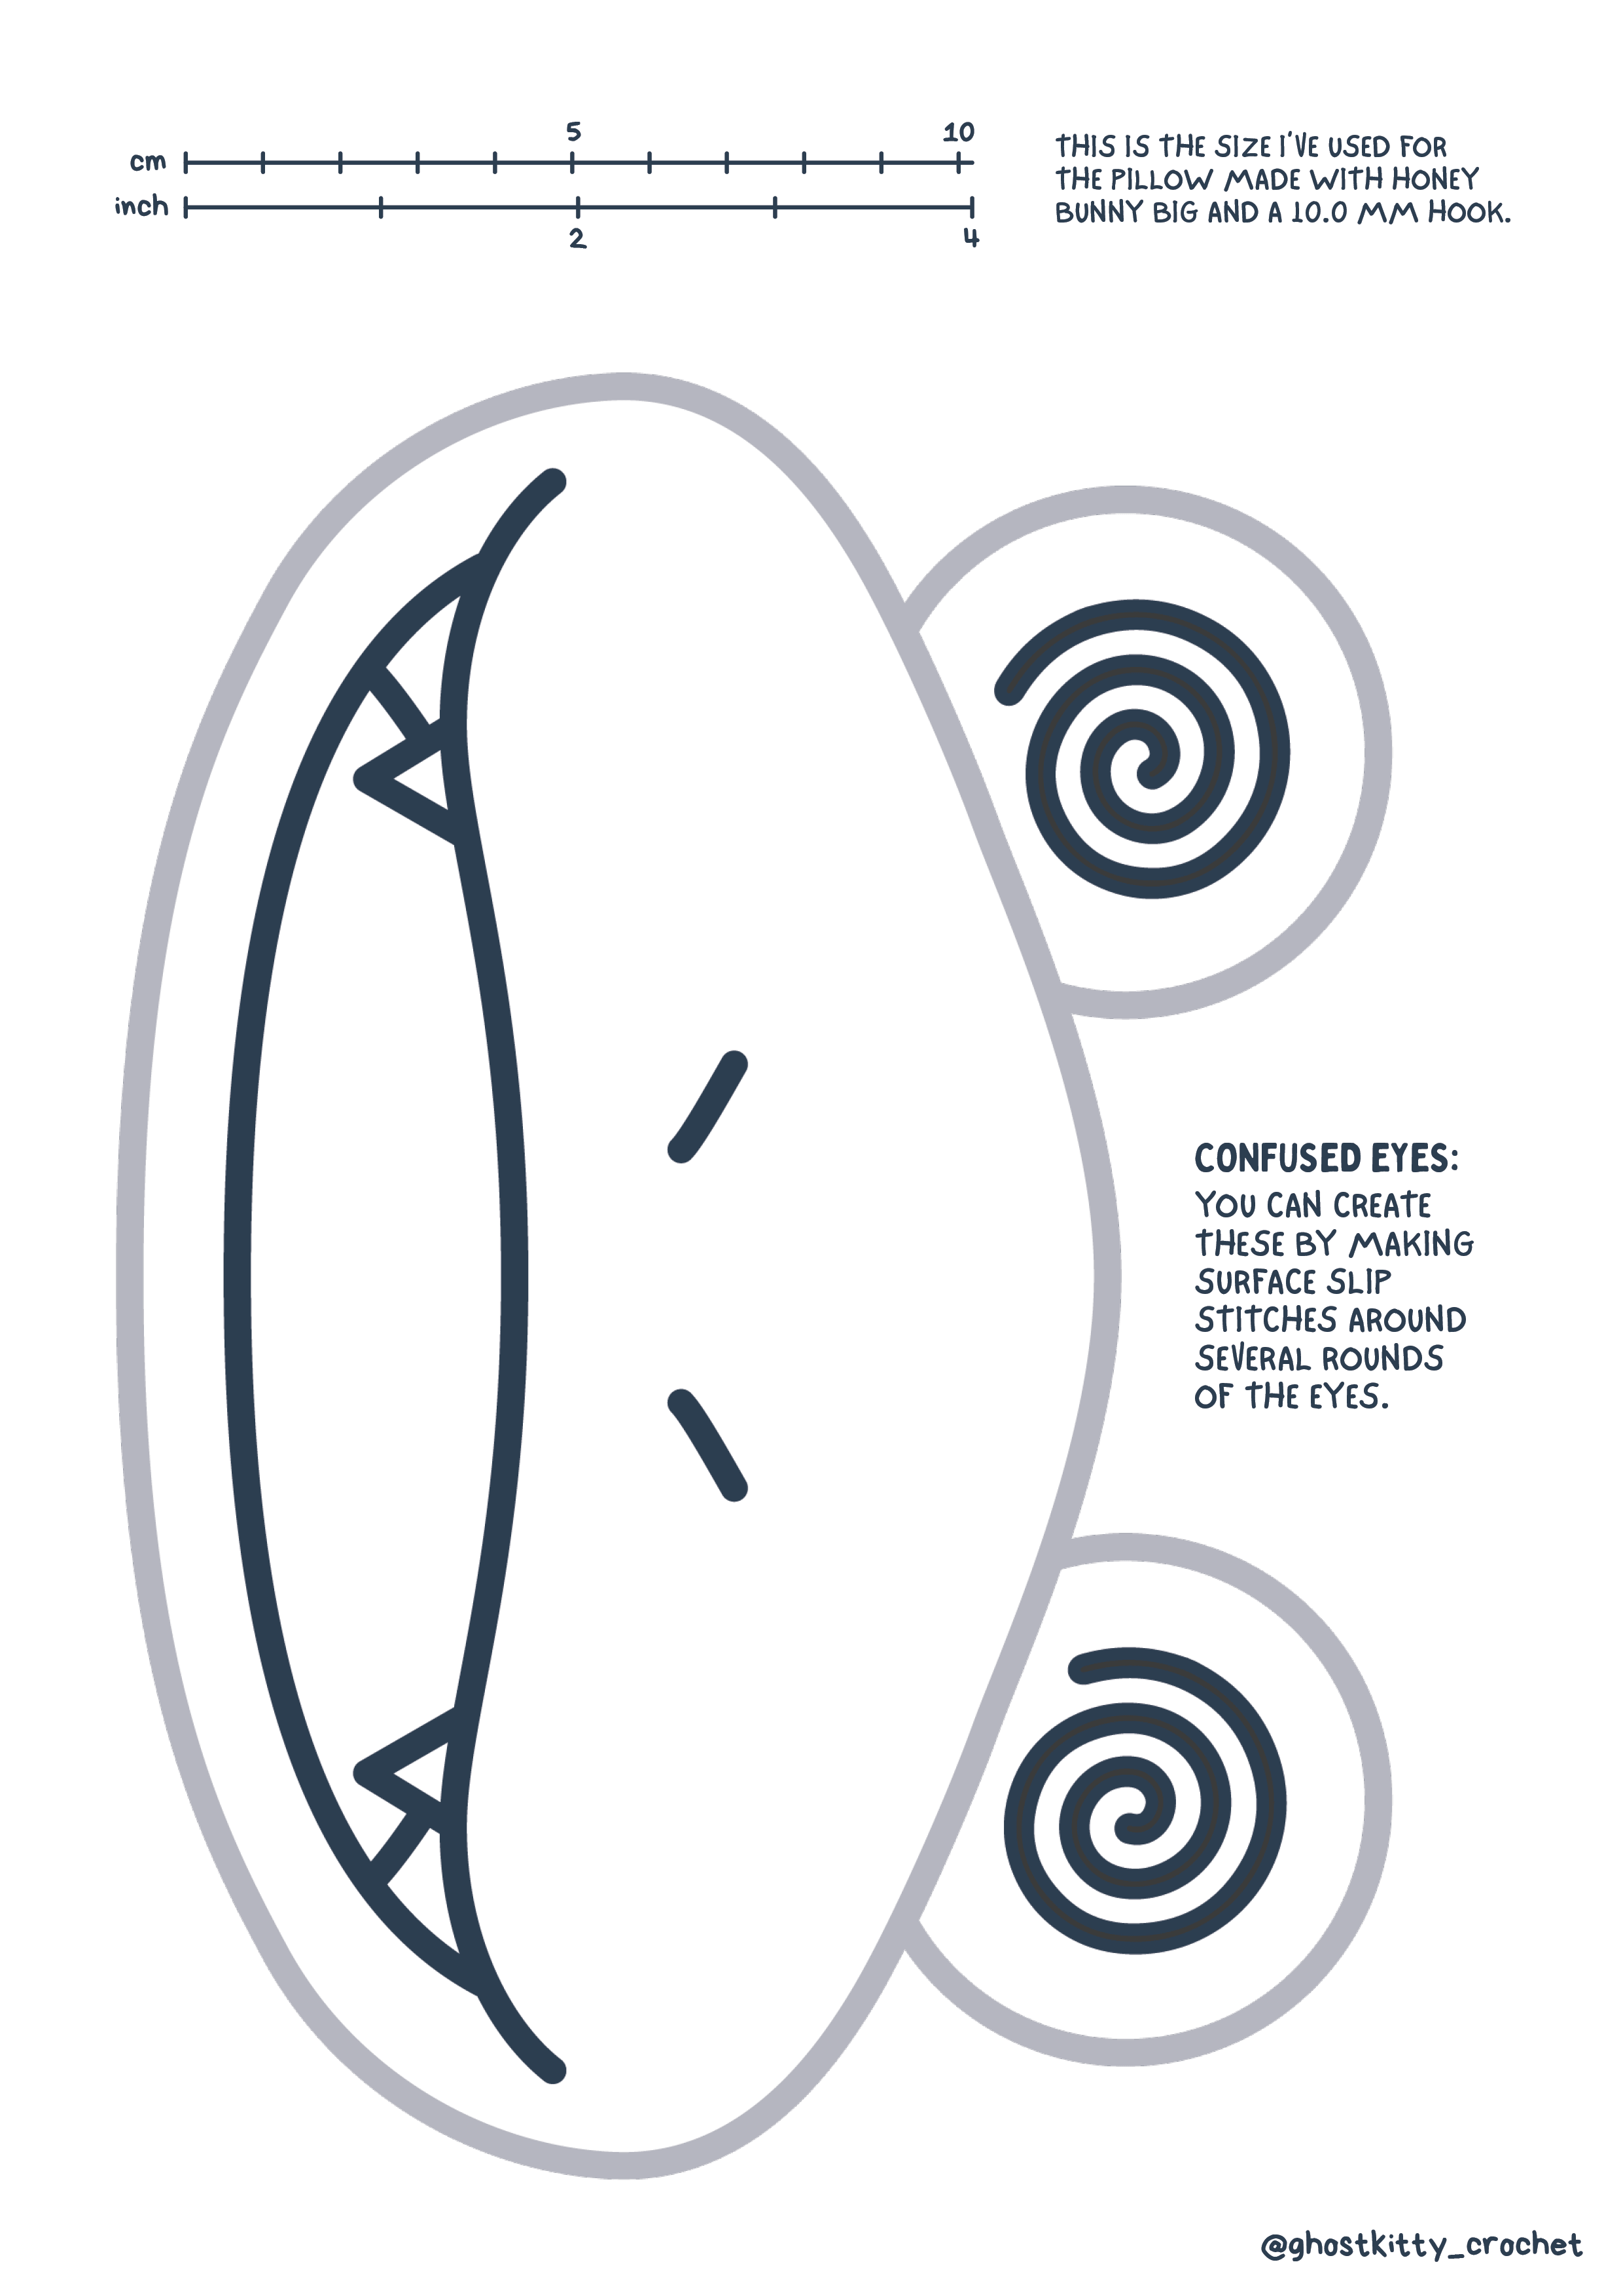
Feel free to use black cotton yarn to embroider the pupils, or make surface slip stitches around half of a round to make a smiley expression. Otherwise, we can add it with back felt.
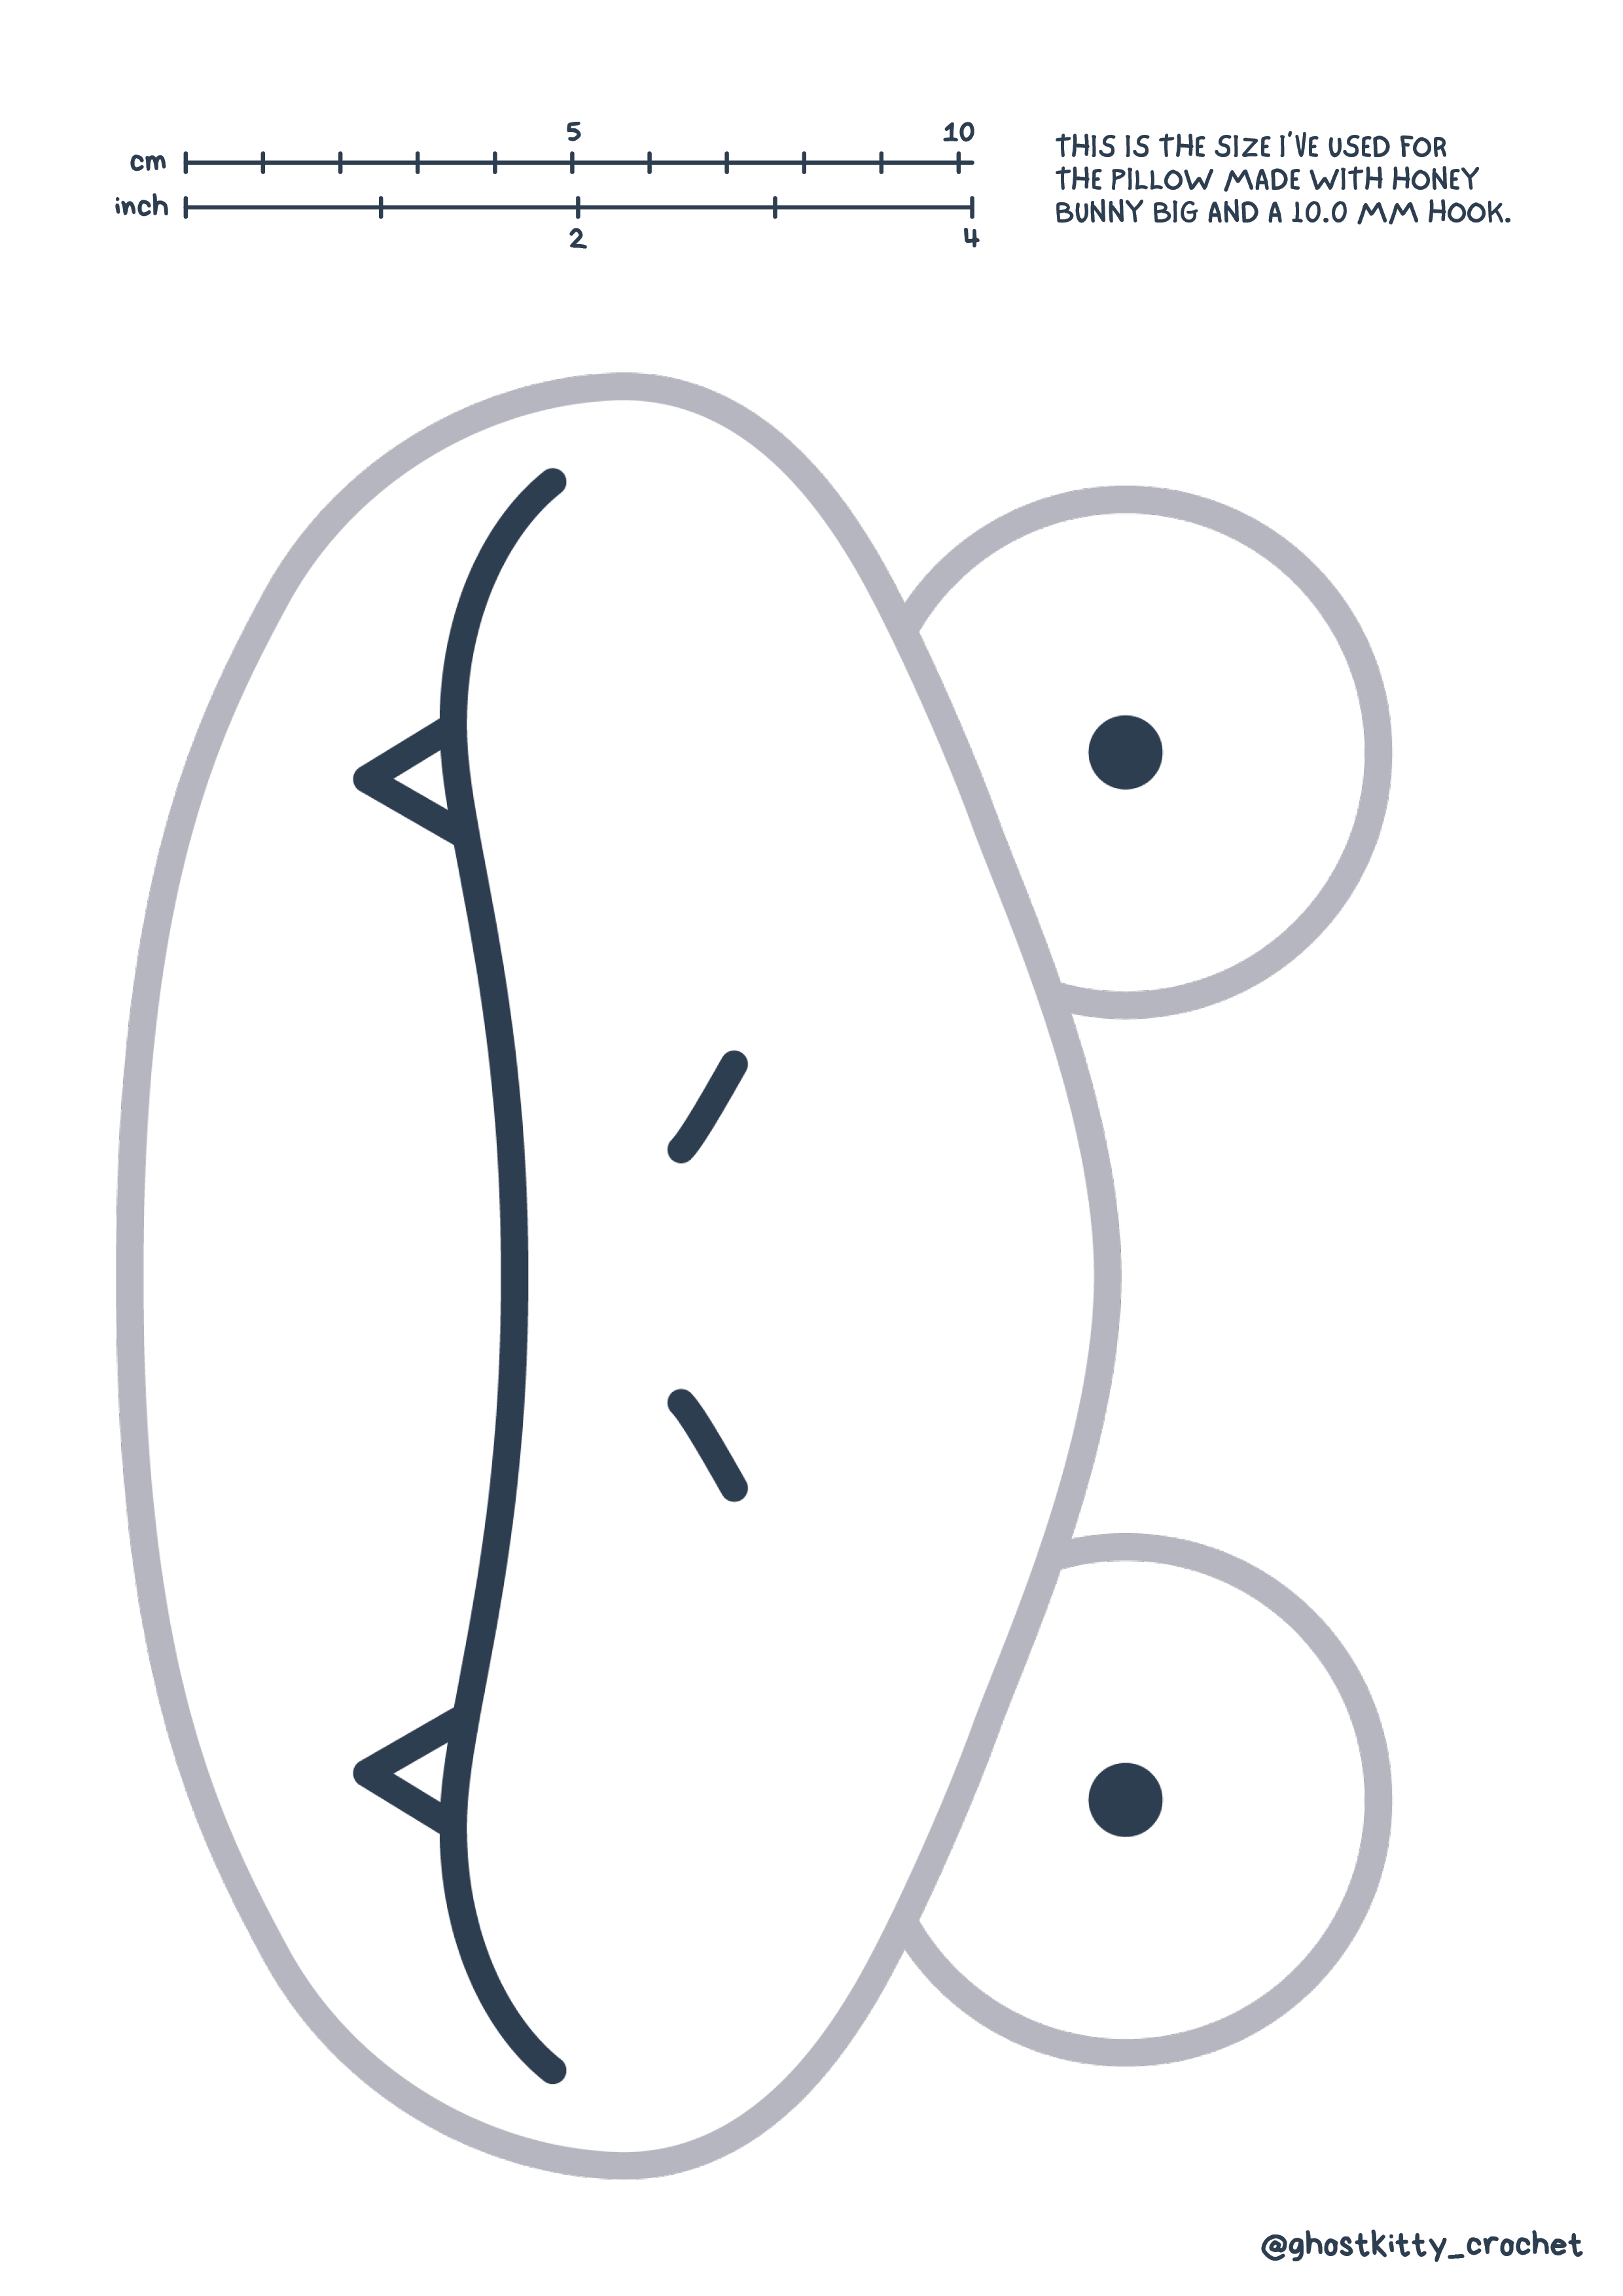
Face templates
Click on a face template to open the A4 pdf in a new tab. You can print it or trace it from your screen. This is the size I used for the pillow made with Hobbii Honey Bunny Big. If you used a different type of yarn, you might have to adjust the size.
Feel free to get creative! You can cut and glue pieces of felt, embroider the face, or make surface slip stitches.
Assembly Guide
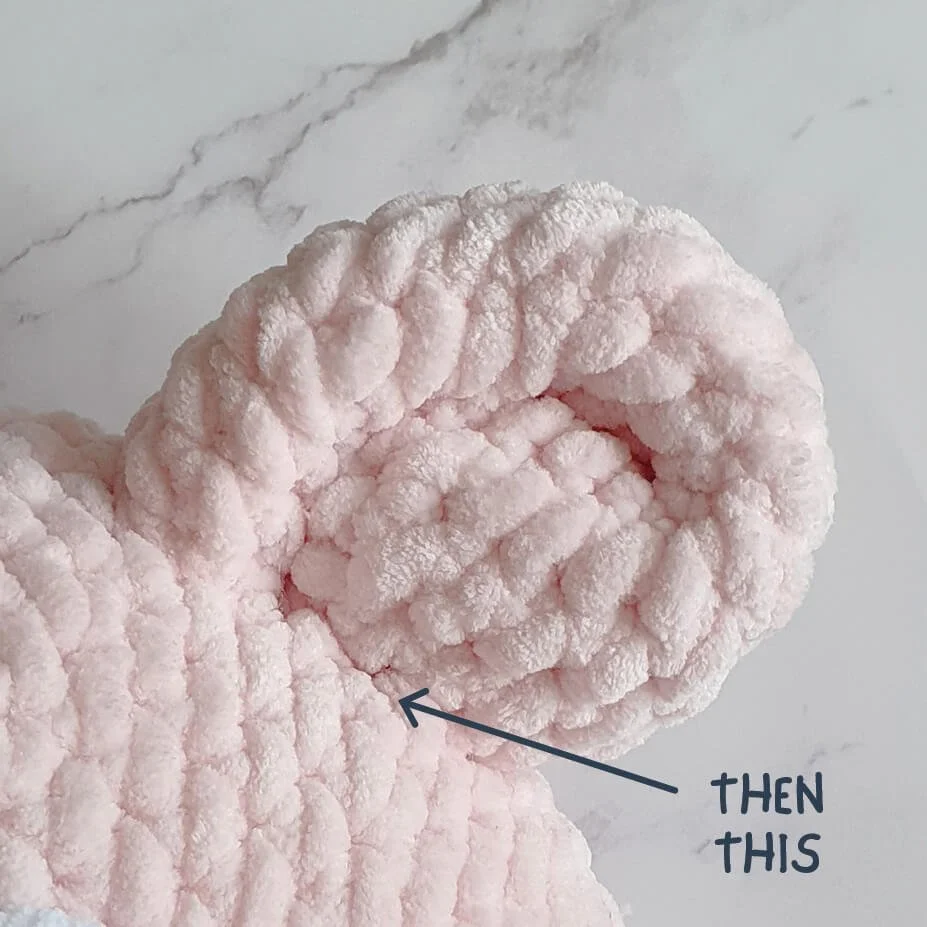
Ears
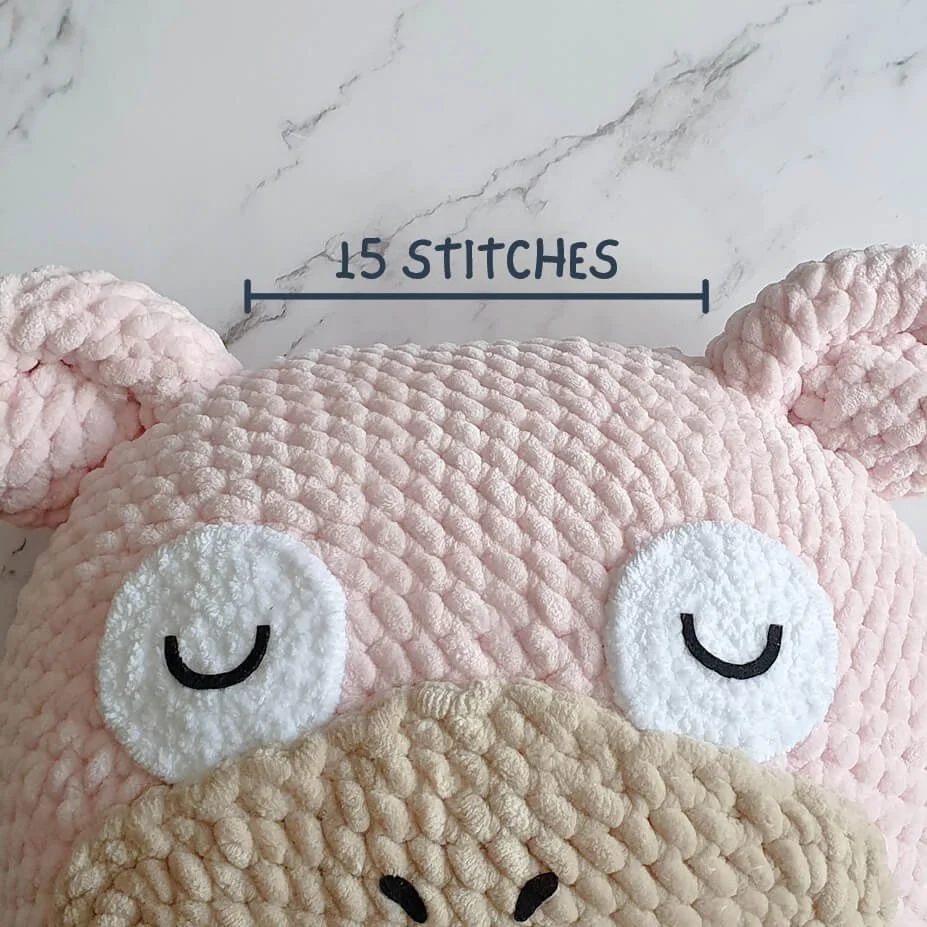
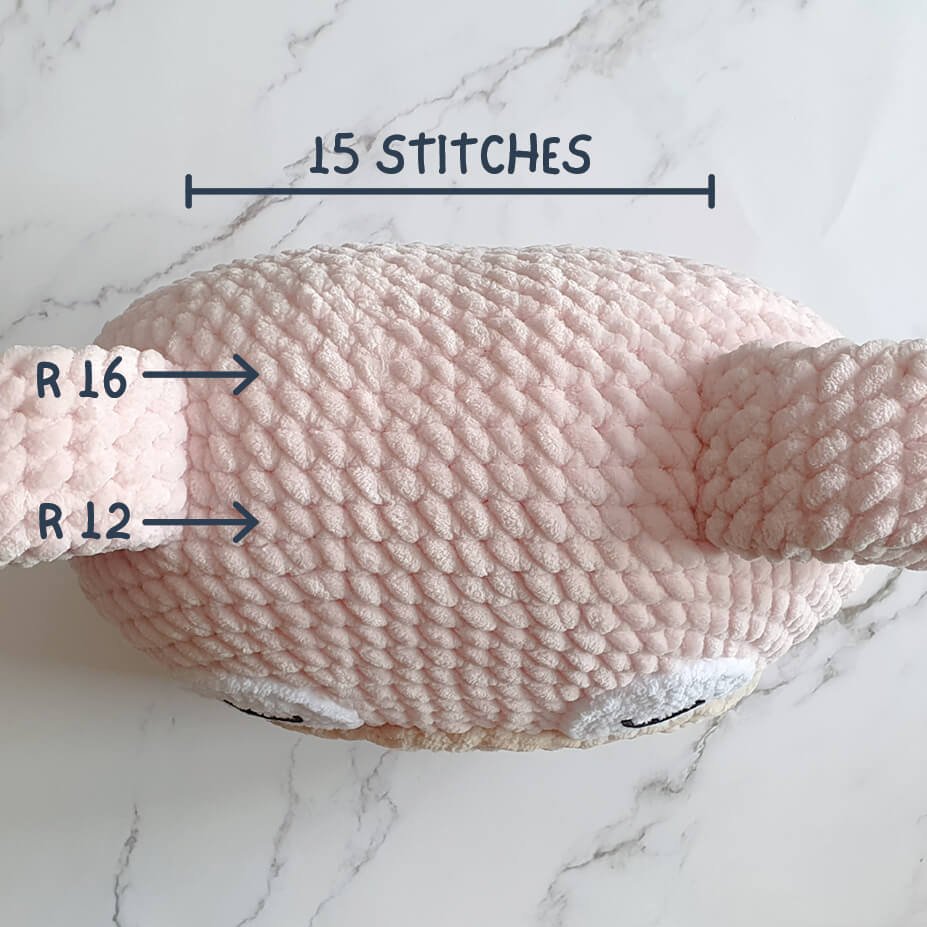
Sew the ears onto rounds 12 - 16 (or if you've made your pillow thicker or thinner: the most centered rounds). There should be 15 stitches in between the ears.
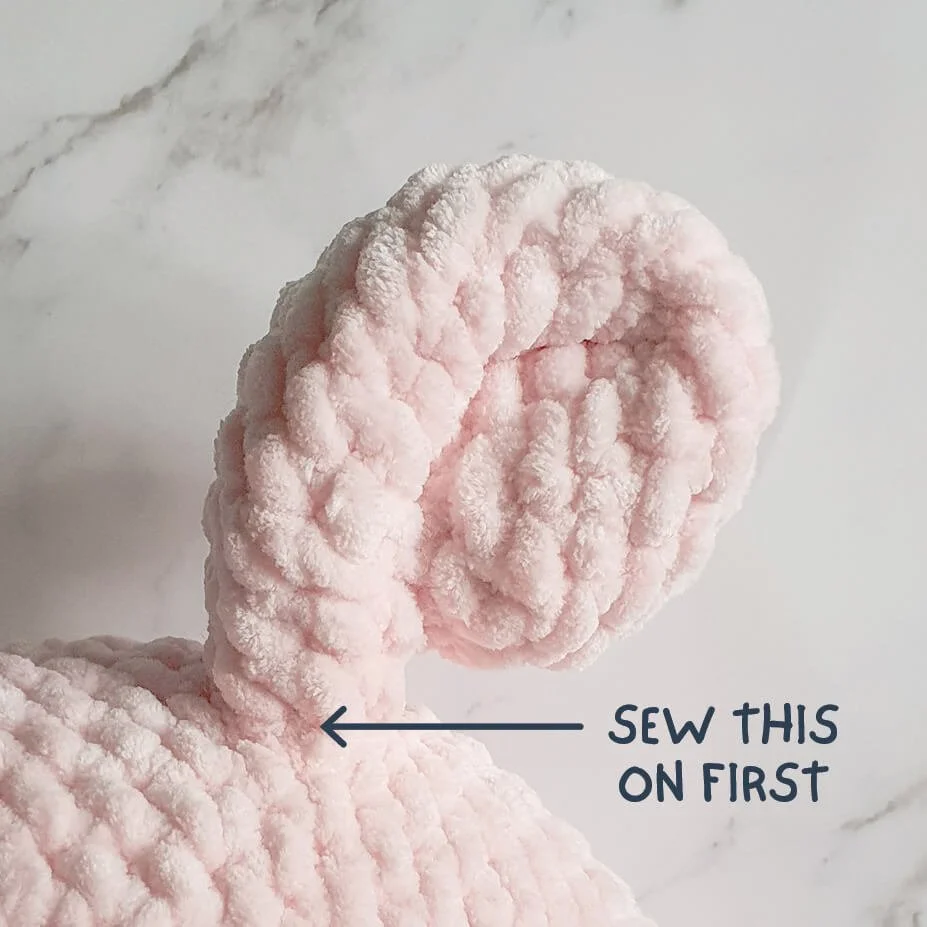
I recommend sewing the last round on first, then the curly part.
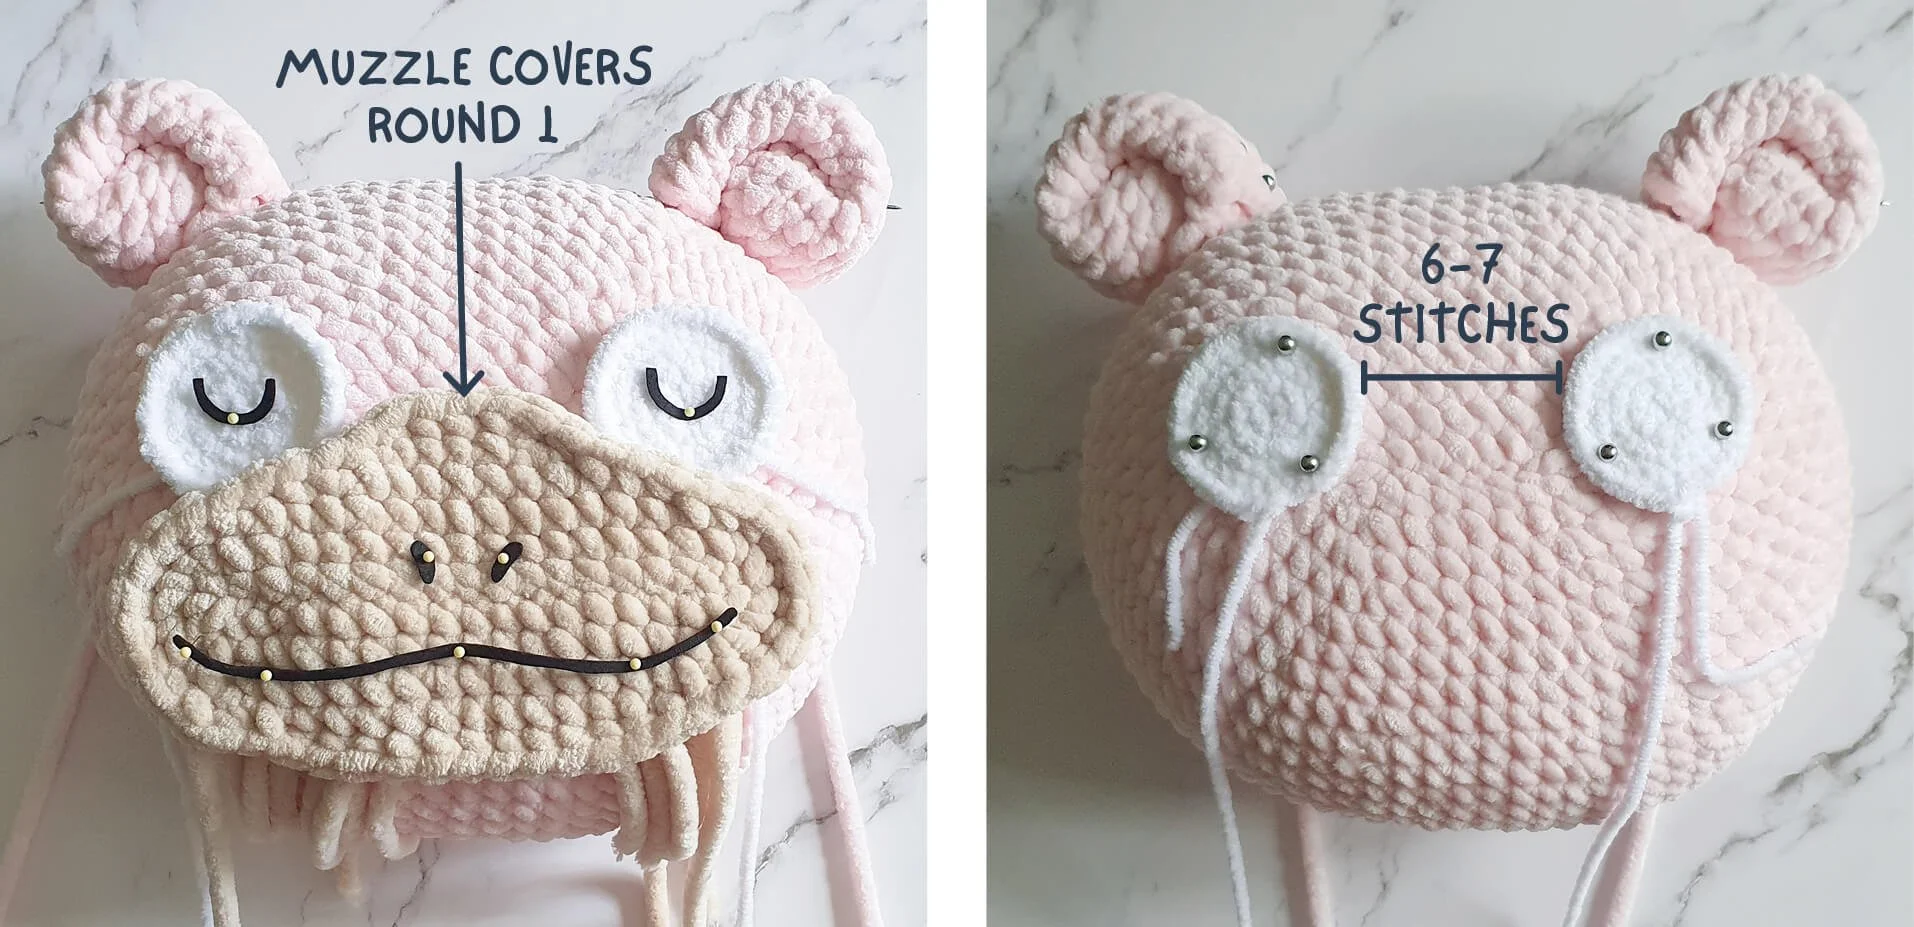
Eyes
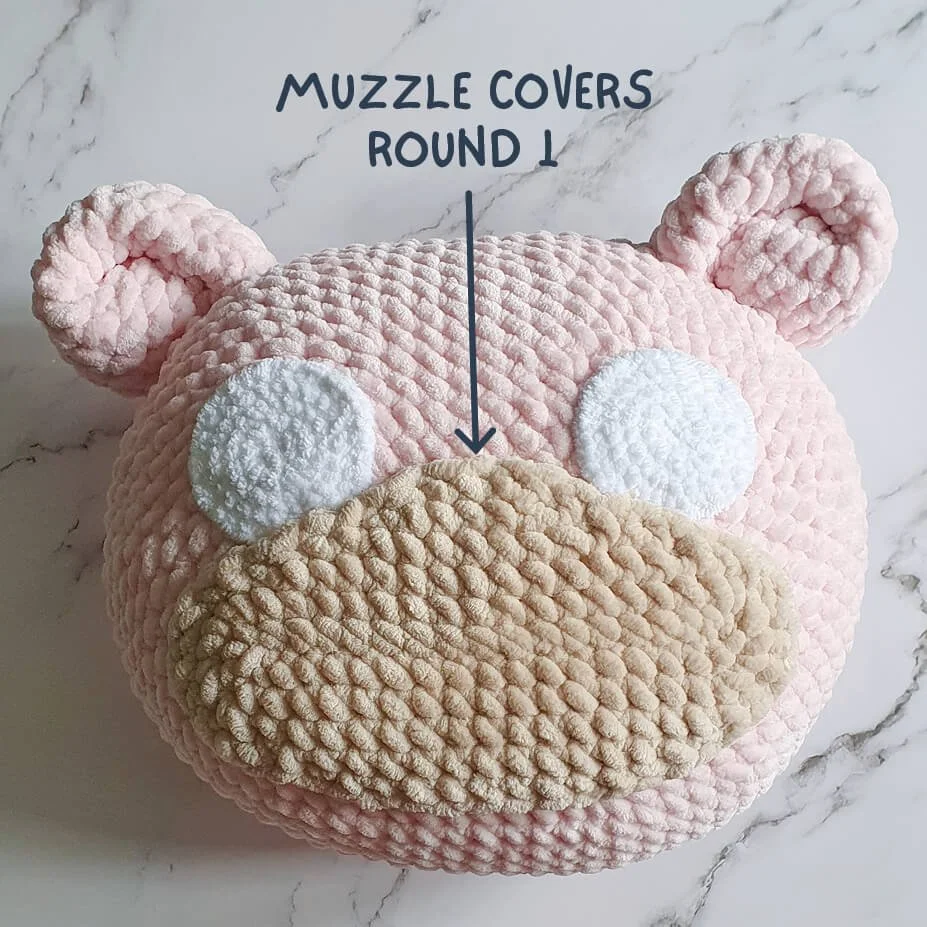
First pin the muzzle on so its top center covers round 1 of the pillow. Then pin the eyes on so they're just slightly covered.
If you've already embroidered the eyes or glued felt onto them, make sure they're not rotated or upside-down!
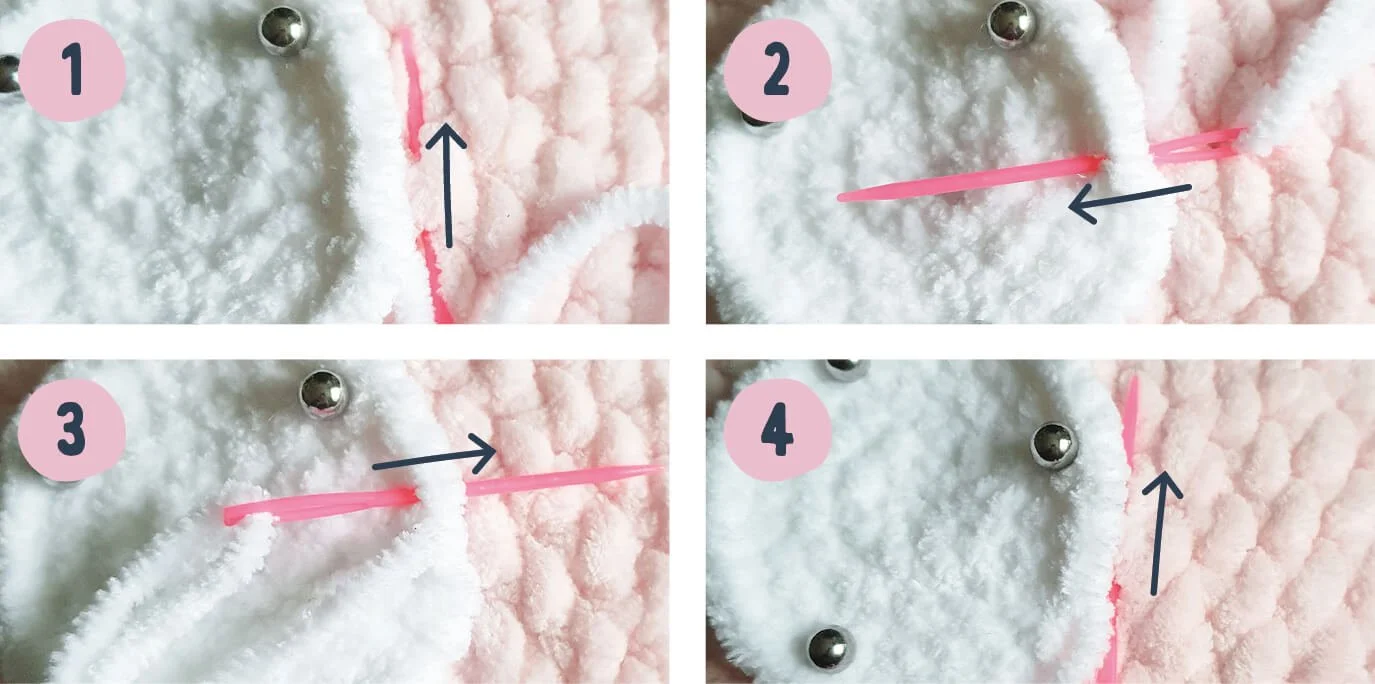
Sewing tips for the eyes
It can be a bit awkward sewing these onto a pillow made with thicker yarn. Just try to use whichever stitch is closest!
1. Weave the tail through the pillow in line with the piece you're sewing on.
2. Weave it through the next stitch from the bottom to the top side.
3. Weave it back down through the next stitch.
4. Repeat steps 1-3.
Never pull too tightly or the edge might get bumpy, going up and down.
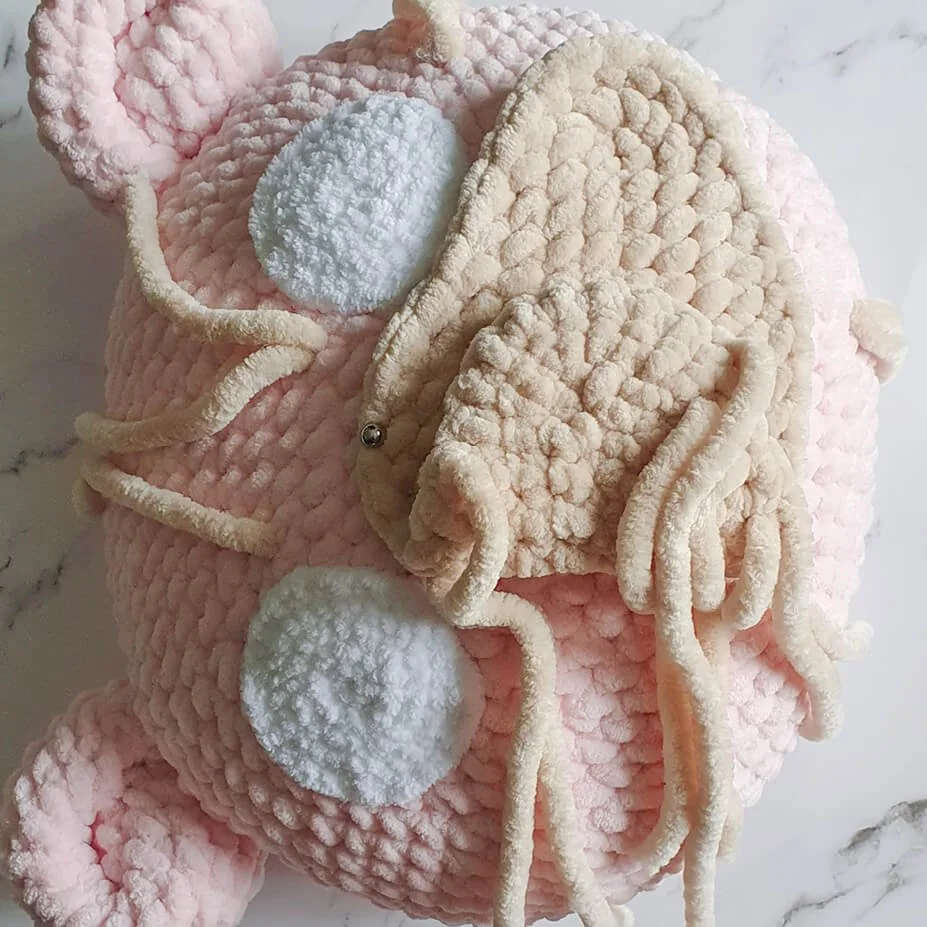
Muzzle
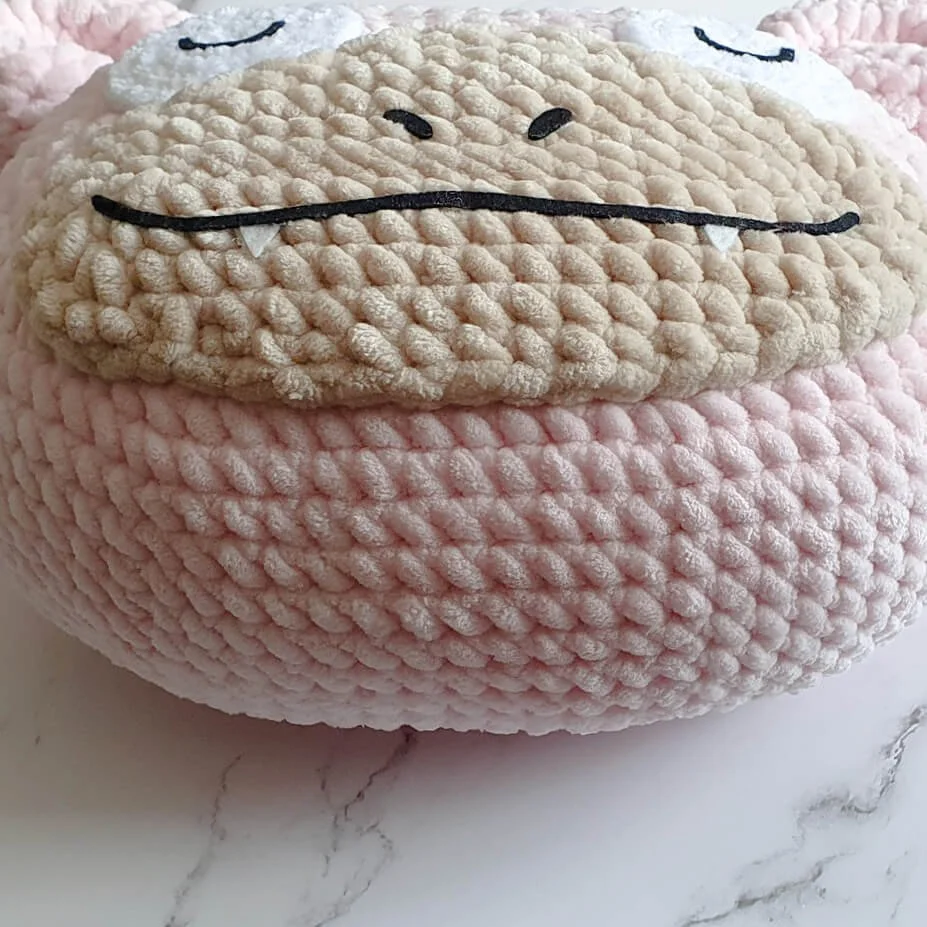
Put the muzzle back onto the pillow and pin the top center and bottom center on. Fold one half up and weave the tails into the closest stitches of the pillow, except for the tail you left for sewing. Work your way from the center to the outside. Repeat with the other half.
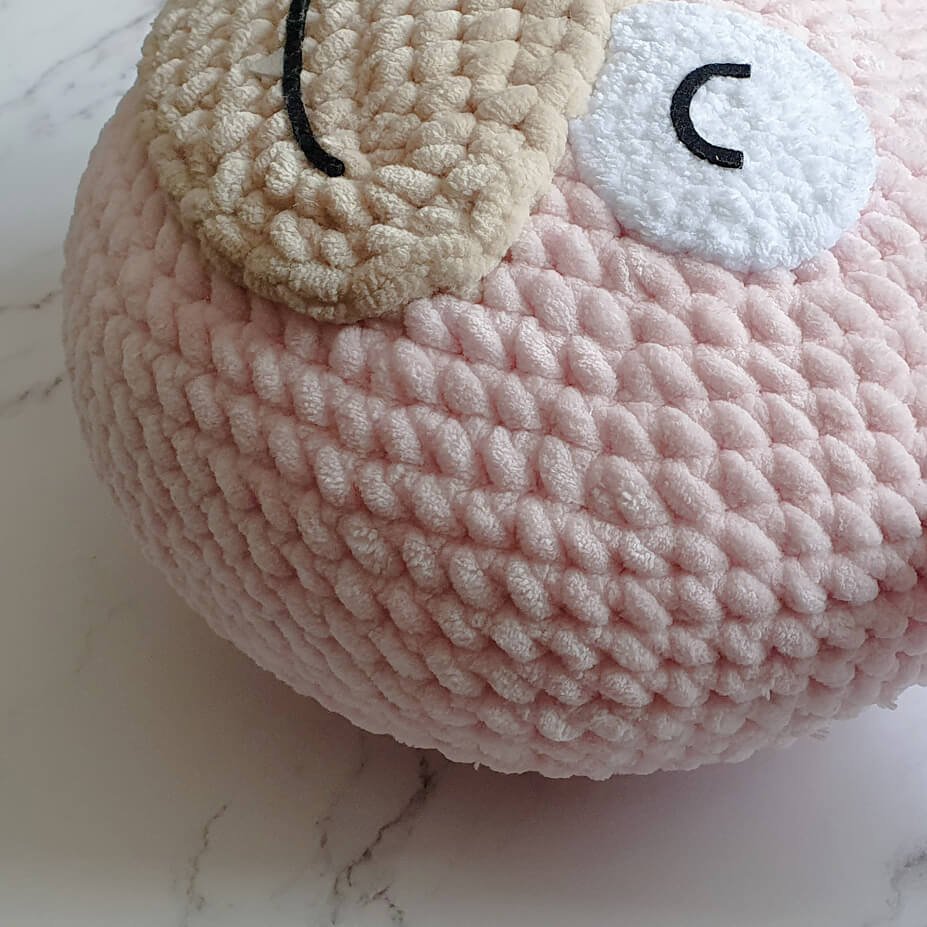
Sew the muzzle on and sew through the eyes for the part where it covers them. Though I didn't stuff, you can use a bit of stuffing if you want the muzzle to stand out a little bit.
Face
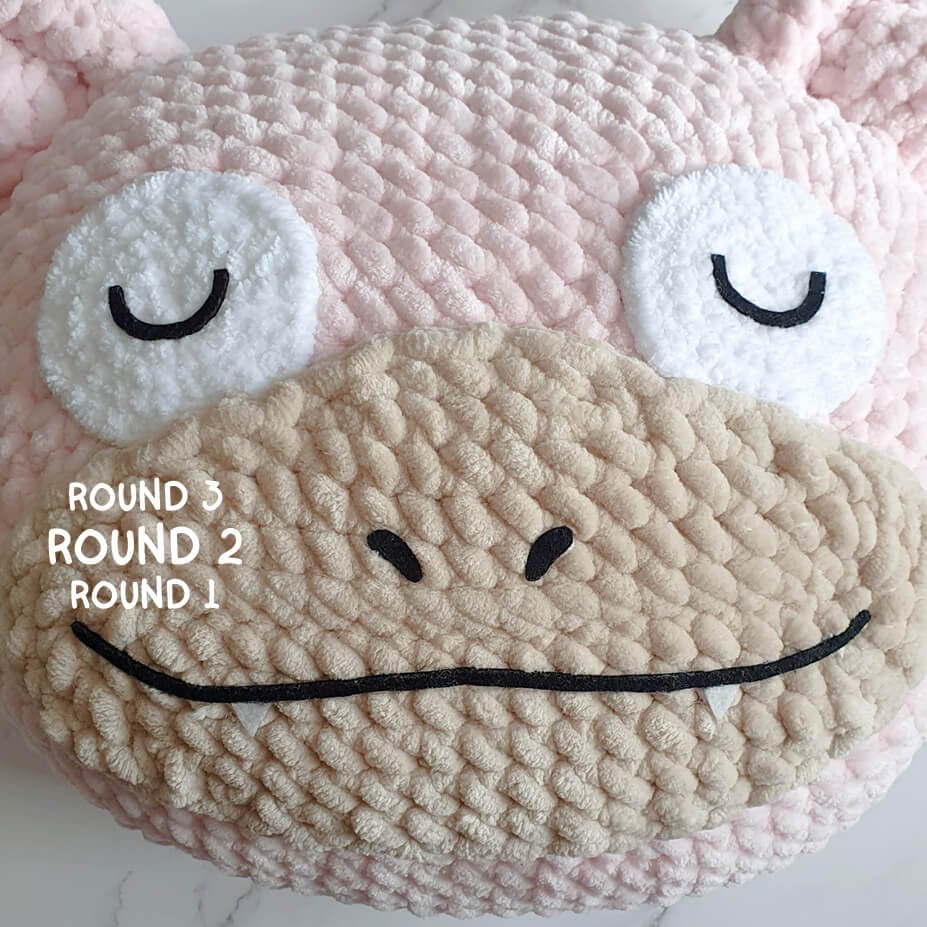
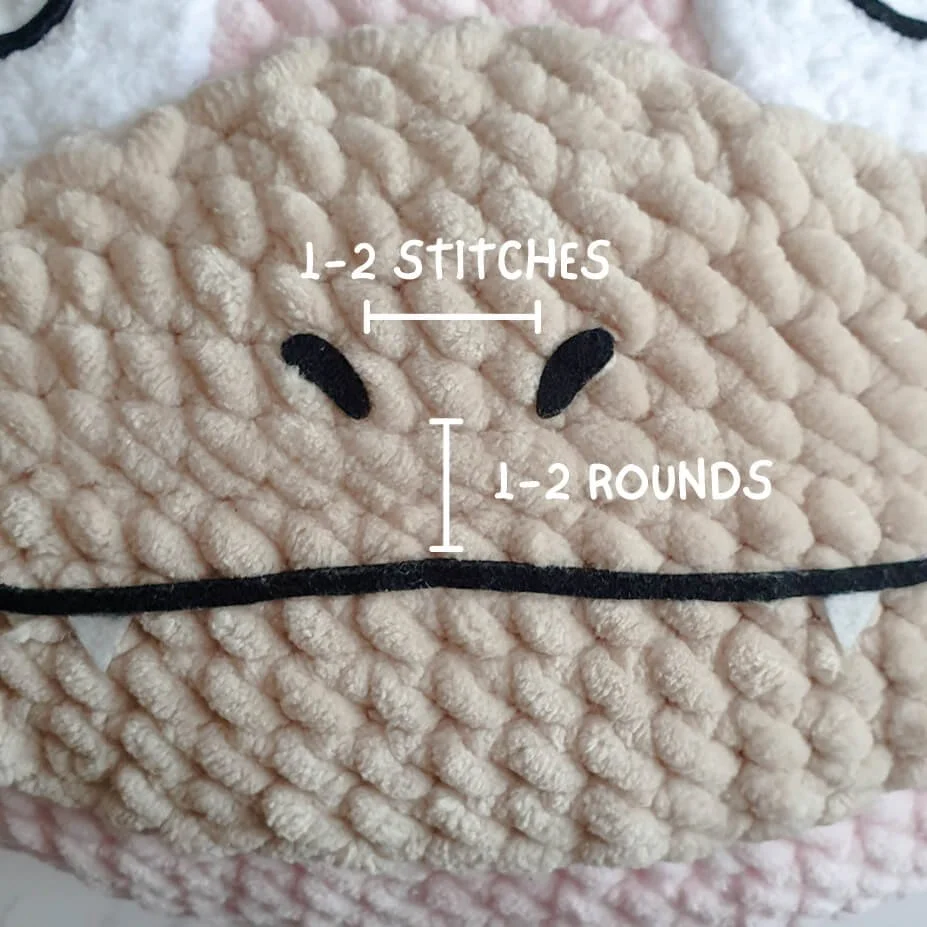
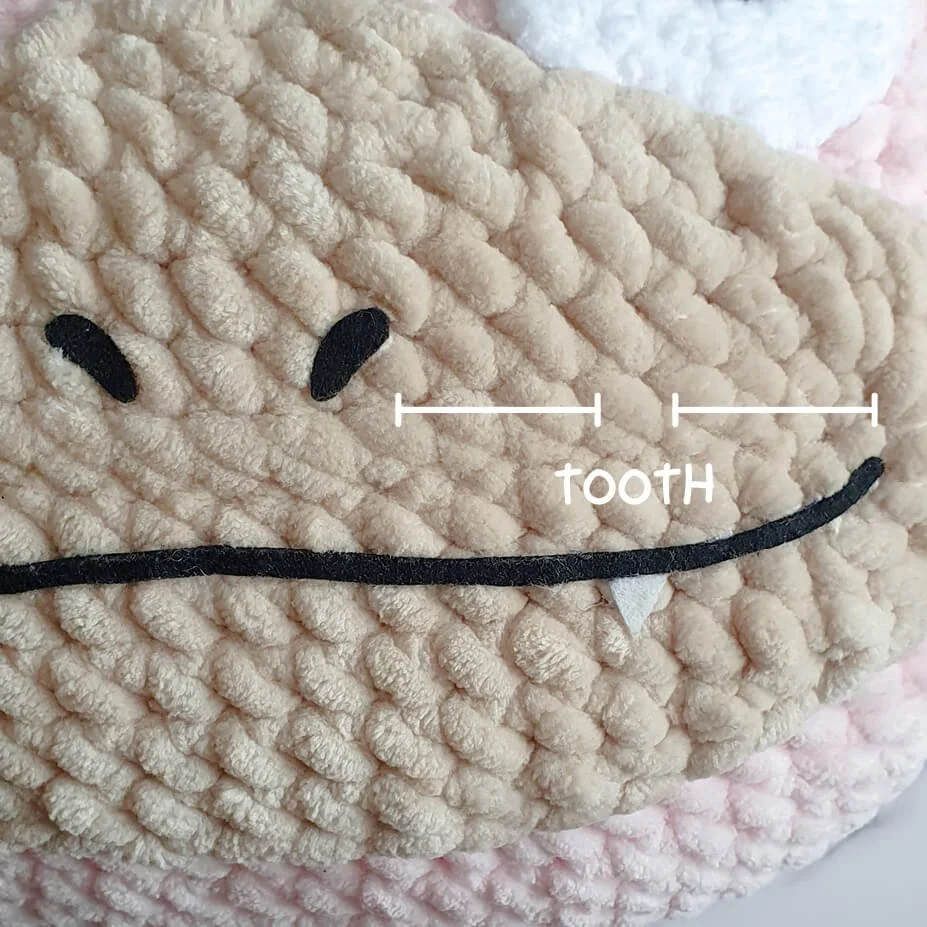
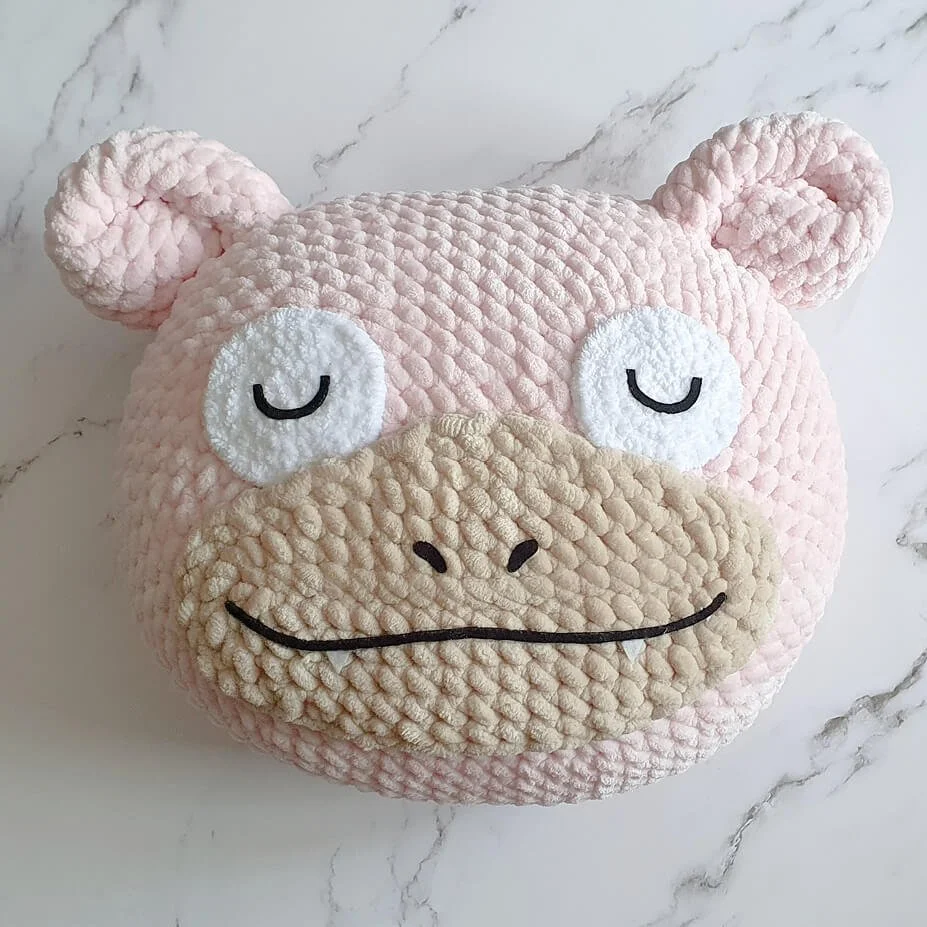
I recommend embroidering/glueing the nostrils onto the top side of the muzzle's round 2, with 1-2 stitches in between. There should be 1-2 rounds in between the nostrils and mouth.
The teeth should be about centered between the nostrils and corners of the mouth.
If you've used fluffy yarn, carefully trim the fluff in the areas you're going to embroider or glue felt onto.
Congrats
You’ve made your very own Slow Monster Pillow! I hope you enjoyed my pattern. If you post your pillow on Instagram, I’d love to see it! Please tag me @ghostkitty_crochet :)